Lily and Kevin asked me to make them a wooden backdrop for their wedding ceremony. I explored a number of alternatives with inspiration from both their "save the date" announcements as well as Pinterest. The final idea for four interlocked squares was a combination of both. A few alternatives on the chosen theme were sent to Lily and Kevin. They selected the following design.
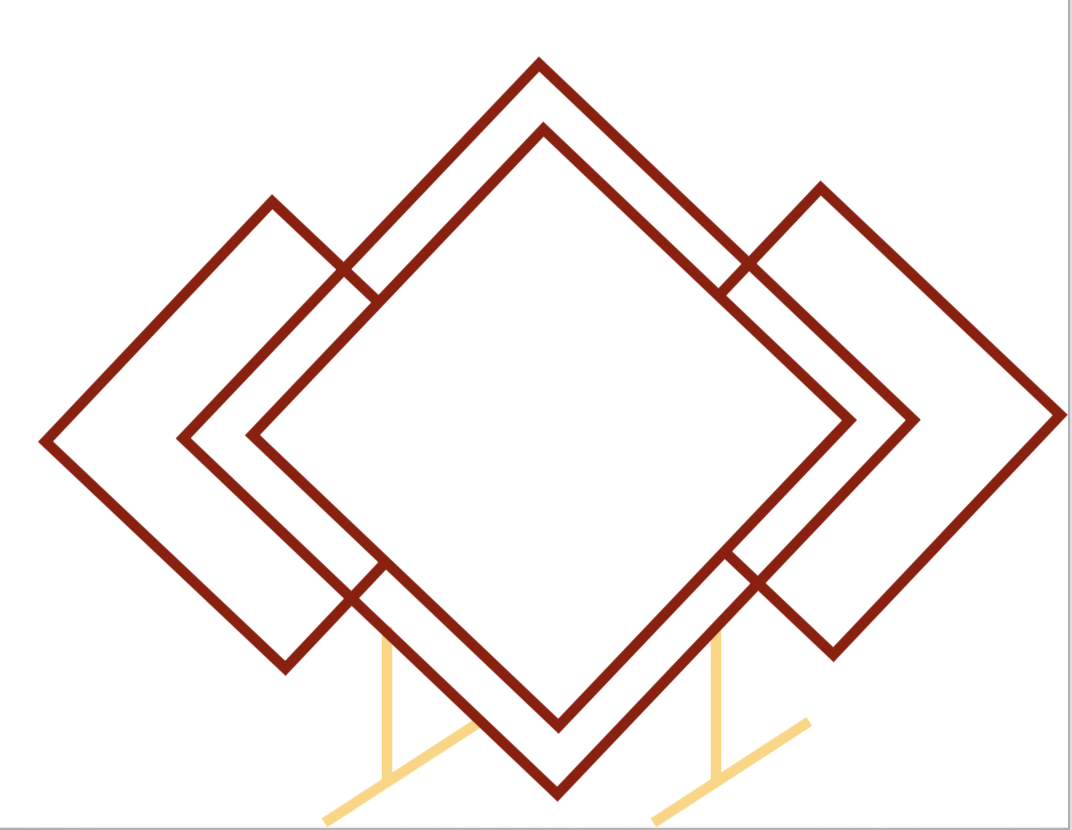
I like the ratios of squares, so will stick pretty close to them. The lengths of the measured square sides from the picture are 1 5/16", 1 11/16", and 2 1/16". Relative to the large central square the size ratios are 0.636 to 1 and 0.818 to 1. In the sketch above the side squares are not centered on the corners of the large squares. The ratio of inner to outer is 1.223. I am not sure how tall the backdrop should be. The following table covers the spread.
"Height" is the diagonal of the large square. "Long Side" is the side of the large square. "Center Side" is the side of the middle square and "Small Side" is the side of a square on the side. "Width Centered" is the width of the entire backdrop if the side squares were centered on the corners of the large square. "Width Offset" is the width after offsetting the side squares. "Offset Shift" is the distance a side square is shifted along two of the sides to get the desired offset. All measurements are in feet.
| Height (ft) | Long Side | Center Side | Small Side | Width Centered | Width Offset | Offset Shift |
|---|---|---|---|---|---|---|
| 8 | 5.66 | 4.63 | 3.60 | 12.20 | 9.98 | 0.51 |
| 7.5 | 5.30 | 4.34 | 3.37 | 11.44 | 9.36 | 0.48 |
| 7 | 4.95 | 4.05 | 3.15 | 10.68 | 8.73 | 0.45 |
| 6.5 | 4.60 | 3.76 | 2.92 | 9.91 | 8.11 | 0.42 |
| 6 | 4.24 | 3.47 | 2.70 | 9.15 | 7.49 | 0.39 |
The following table lists the important lengths to 16ths for cutting. After selecting a height (7' or 7.5') the amount of wood can be determined. The frame needs to be pretty solid, so 1" X 2" (3/4" X 1 1/2") (or maybe 2" X 2") boards are probably needed. Thicker wood is preferable, so either 2" X 2" or doubled 1" X 2" lumber will be used. A base also needs to be designed. 22 Screwed lap joints may be the best way to assemble; allowing easy break down and storage. It is unclear how best to hide the screws. Alternatively, polished brass screws (with square heads) might look nice against the painted wood.
| Height (ft) | Long Side | Center Side | Small Side | Offset Shift |
|---|---|---|---|---|
| 8 | 5' 7 11/16"" | 4' 7 9/16" | 3' 7 3/16" | 6 1/8" |
| 7.5 | 5' 3 5/8" | 4' 4 1/16" | 3' 4 7/16" | 5 3/4" |
| 7 | 4' 11 3/8" | 4' 5/8" | 3' 1 13/16" | 5 3/8" |
| 6.5 | 4' 7 3/16" | 3' 9 1/8" | 2' 11" | 5 1/16" |
| 6 | 4' 2 7/8" | 3' 5 5/8" | 2' 8 3/8"" | 4 11/16" |
Could not readily find brass screws, so went with stainless steel screws instead from Bolt Depot. Ten 2" X 2" pine boards will be purchased from Menards at $11.52 each. This will cover the 7' plan. The four complete small sides will come from the four boards targeted for the medium square sides (4'). The four partial sides will be from the four boards used for the large square sides (5'). An additional 12' of lumber is needed for the two supports (2' long base with 3' long vertical and a 1' angle). The plan is to cut the boards to length, mark the pieces (backs and numbered), cut the laps, clamp & drill for screws, sand, paint, and assemble. Sounds simple!
All of the full sized square sides (small, medium & large) will be cut with rabbets on opposite sides. The short sides for the small squares will be two different styles: crossing rabbets/dadoes on same or opposite sides of the corner rabbet (two of each). The supports being three feet tall will cross all three squares at 45° angles. The dadoes for these joints will be marked out and cut after the squares have been assembled.
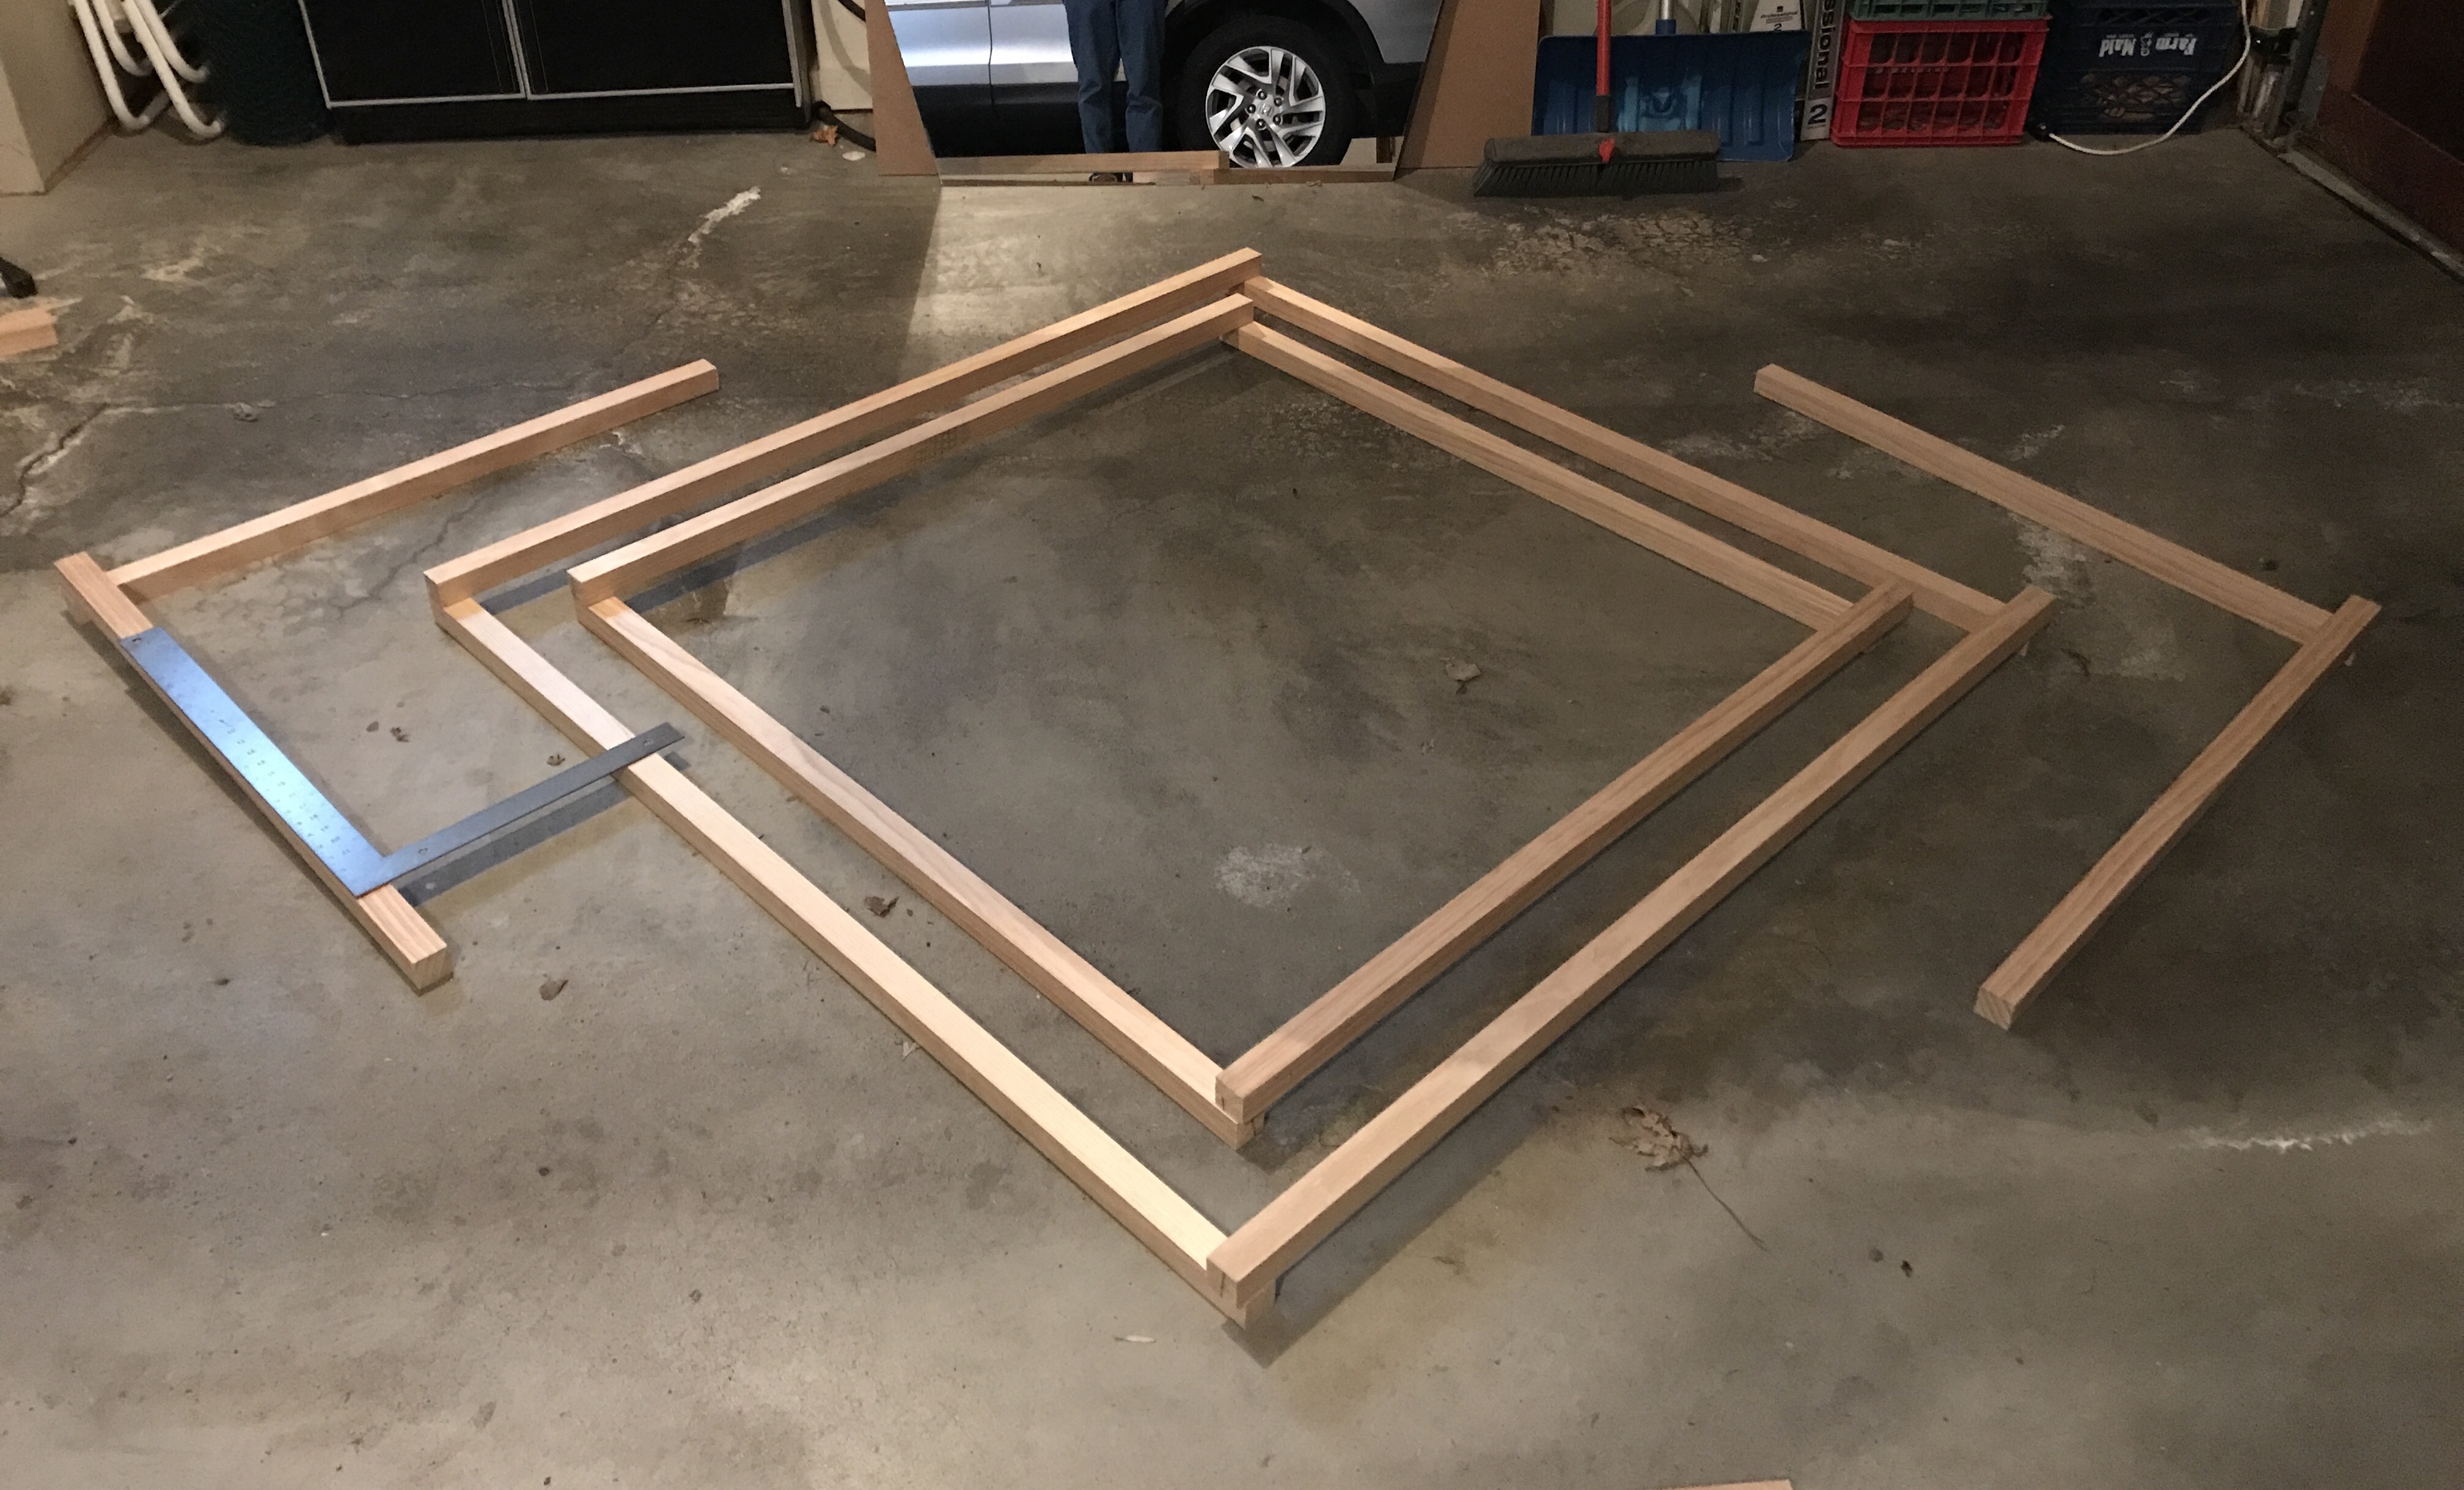
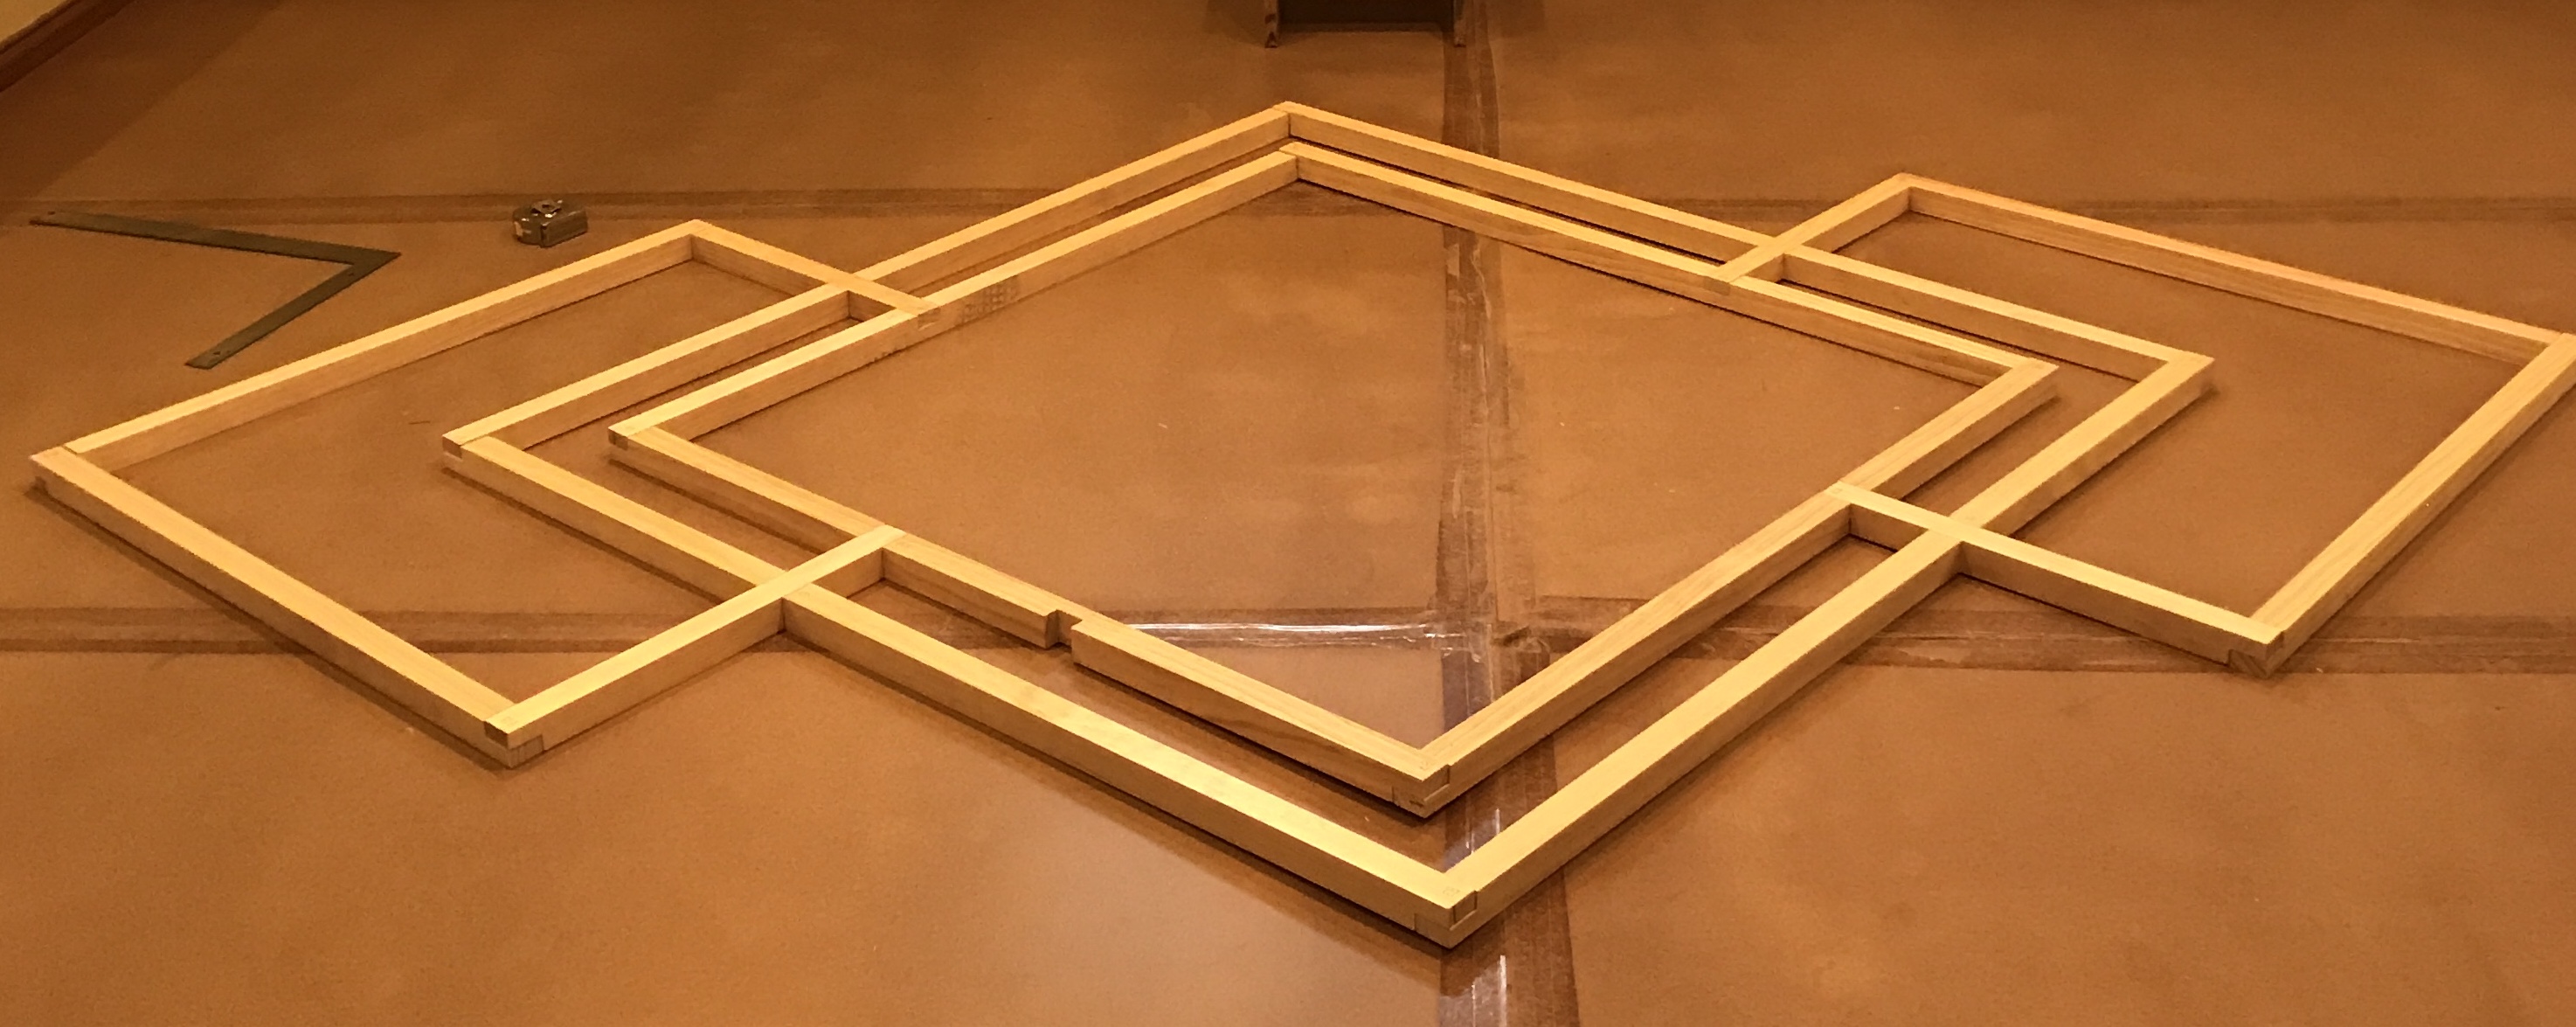
A dozen eight foot 2 X 2's were purchased with Levi's help (Menards select pine). Each board was marked and cut to length according to the 7' line in the table. This produced the four sides of the large and medium squares as well as the four outer sides of the small squares. To determine the correct length for the short sides of the small squares, the two inner squares were assembled. First, the large square was squared up. The medium square was then squared and set equidistant from the sides of the larger square. After a few calculations the sides of the small squares were put in place square and about 13 1/4" outside the larger square. Waste from the large side was laid across the small, large and medium squares. It was marked at slightly longer than 20". The four 'waste' boards were cut to this length. A picture of the mostly complete layout is shown below. (Yes, those are my legs in the background in Sue's mirror for which she has requested a frame.)
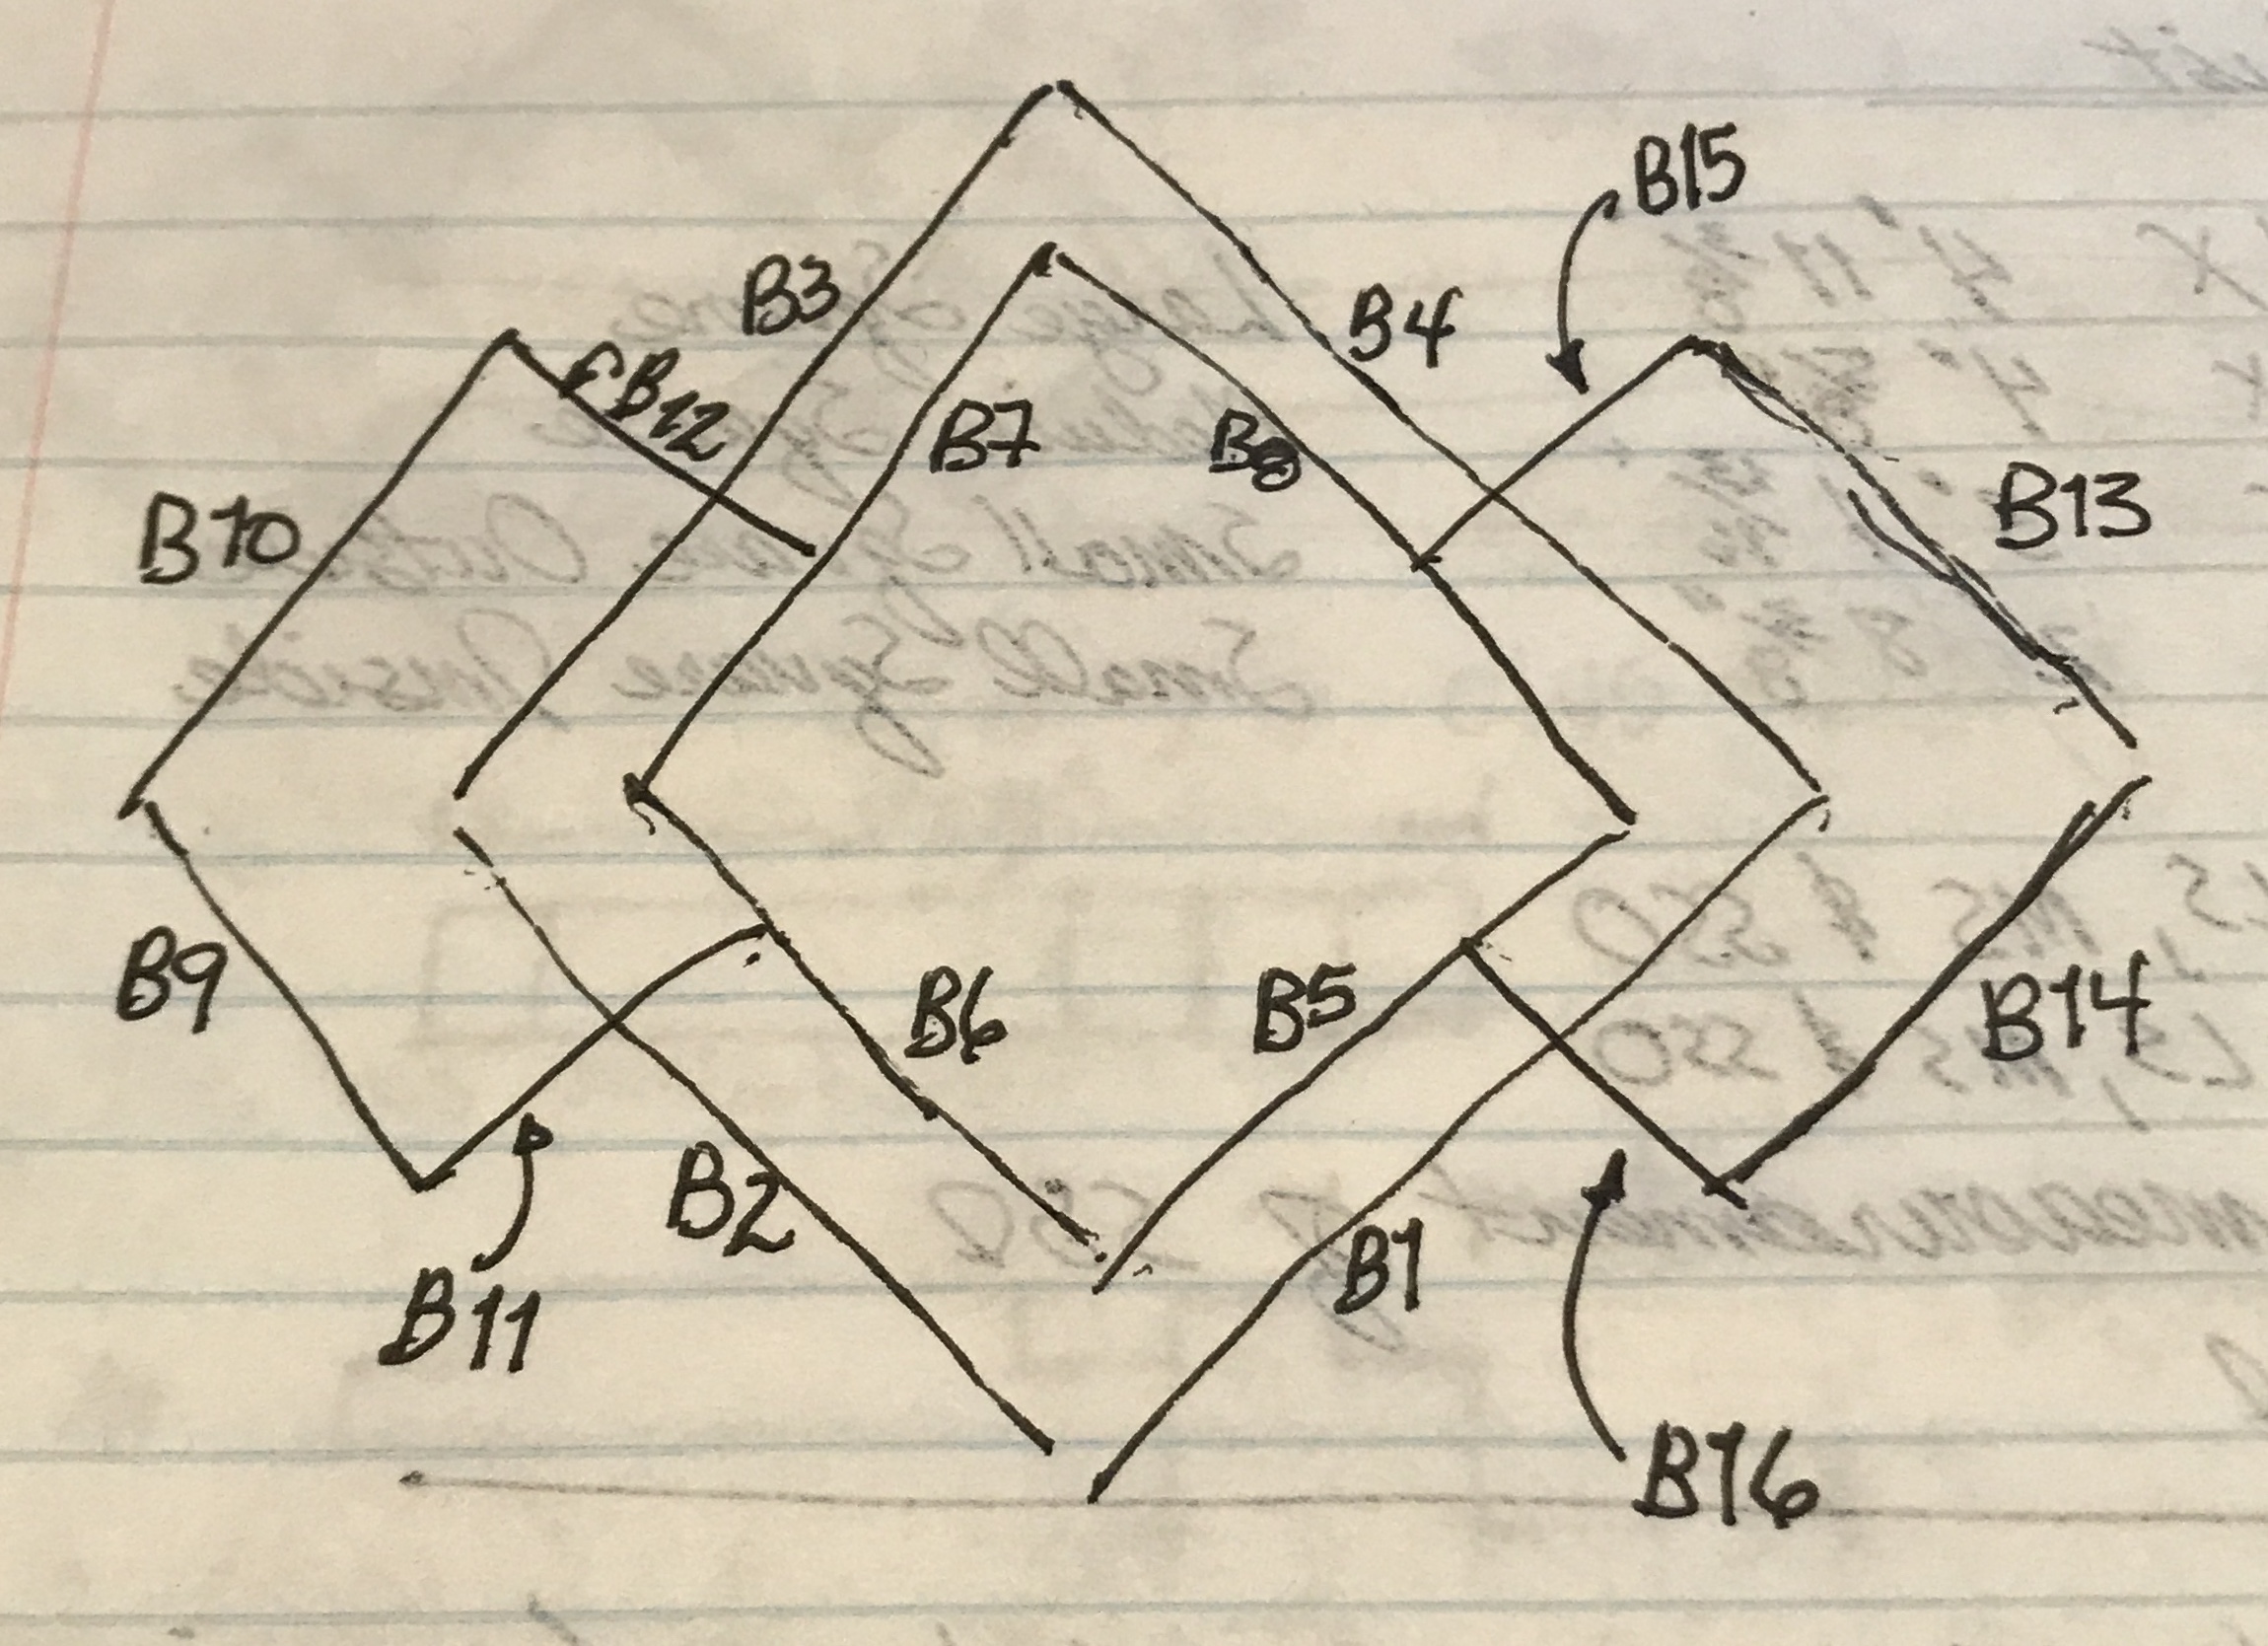
The lap joints were marked on the large, medium and small outside sides. They were laid out on opposite sides on each piece. This way each piece will have half a lap on the front and on the back. The dado blade was set in the table saw with a width of 3/4" and a depth (over the crosscut sled) of 3/4". A trial cut in scrap indicated the necessary adjustment. The width of the cut was set with a block of wood 1 1/2" from the edge of the sled. The parts marked out above were all cut on opposite faces of both ends. The partial sides of the outer squares had half laps cut in one end. The large and medium squares were laid out on the basement floor and adjusted for square and for the ~3 7/8" gap between the two squares. The four full sides of the outer squares were also laid out in position relative to the large square with an approximately 12" gap with respect to the large square. A picture below shows the numbering layout for all 16 parts.
The truncated sides were then laid out across the three boards crossed. Things were trued up with the framer's square and then the large and small squares were marked for dadoes. The truncated side was also marked for the dado and for the rabbet. All sixteen of these marked sites were cut with the dado blade aligning everything by eye. The pieces were all returned to the basement floor where they were assembled. A picture shows the assembled backdrop.
Notice the "extra" dado cut in part 3!. Saw a mark and cut. Still don't know how the mark got there. It was repaired by gluing in a block of pine. A little wood putty and paint and it will never be seen.
Two of the sides of the large square were held slightly outside of the position required by their adjacent sides due to the dado in the partial sides of the outer square. The offending dadoes were "adjusted" with a chisel. The plan is to drill and screw the parts together prior to working on the legs as it is difficult to keep everything aligned for marking without clamping at the joints. A fixture was made to align corners for accurate drilling. A 3/4" X 12" X 12" scrap of particle board serves as the base. Two 2 X 2's were set about 2" from the edge and aligned on two lines drawn with the framer's square making a right angle. These "legs of the angle" were glued to the base. After letting the glue dry for an hour a hold-down clamp was attached at an acute angle to each leg. Finally a 3/4" X 4" X 4" board was screwed to the legs at the corner and a 1/4" hole drilled 3/4" out from each leg to serve as a drill guide. The finished fixture is shown below.
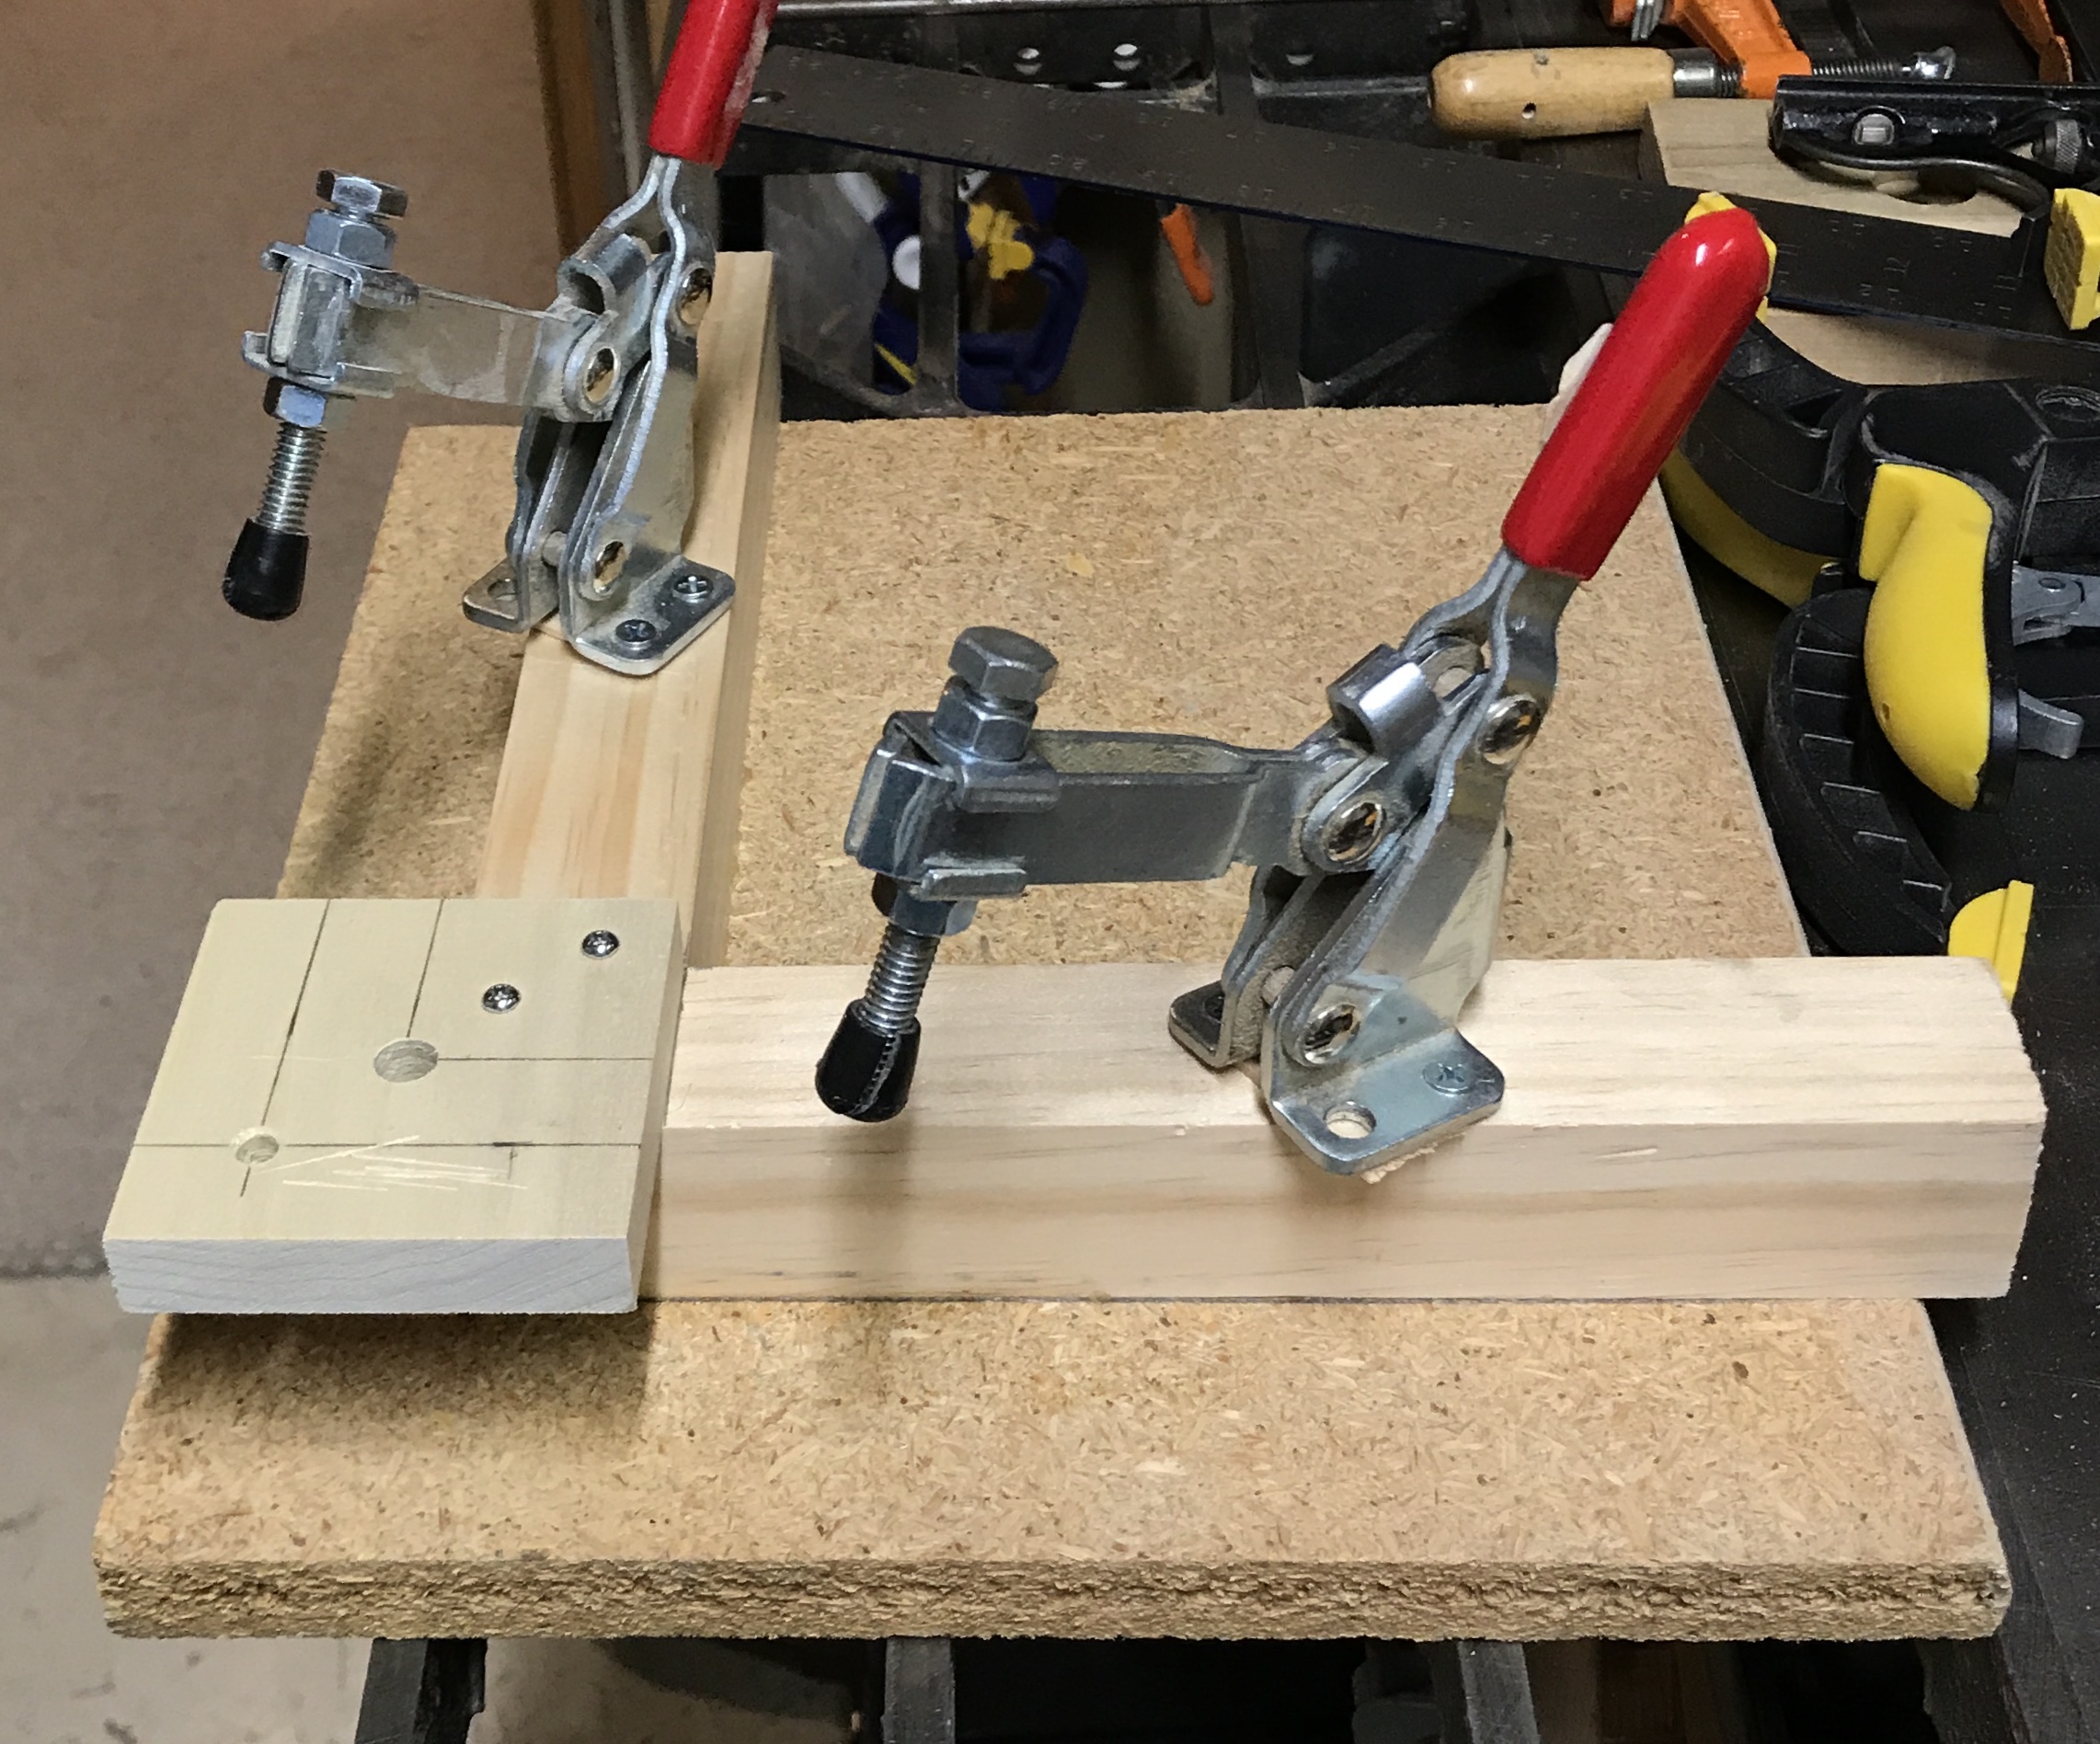
The extra 3/8" hole is for "peeking" at the boards being aligned.
The fixture was then used on the corners of the cut backdrop parts. The fit between the overlapping drilling guide is tight. If the laps are cut slightly less deep than needed the joint is too thick to fit. These laps were "eased" with the chisel as needed. The holes need little cleanup and the stainless steel screws fit nicely. They are attached with a washer on each end and the matching nut. The fixture worked like a champ and all 22 holes were drilled. The picture below shows the assembled frame.
The laps that needed thinned were all on the long and medium sides. The shorter sides were all the correct thickness. The longer sides must have tilted the crosscut sled sufficiently to result in the need for a chisel. The picture shows the back side of the backdrop. Careful inspection reveals screws are put in backwards, that was simply because all of the work was done with the back side up.
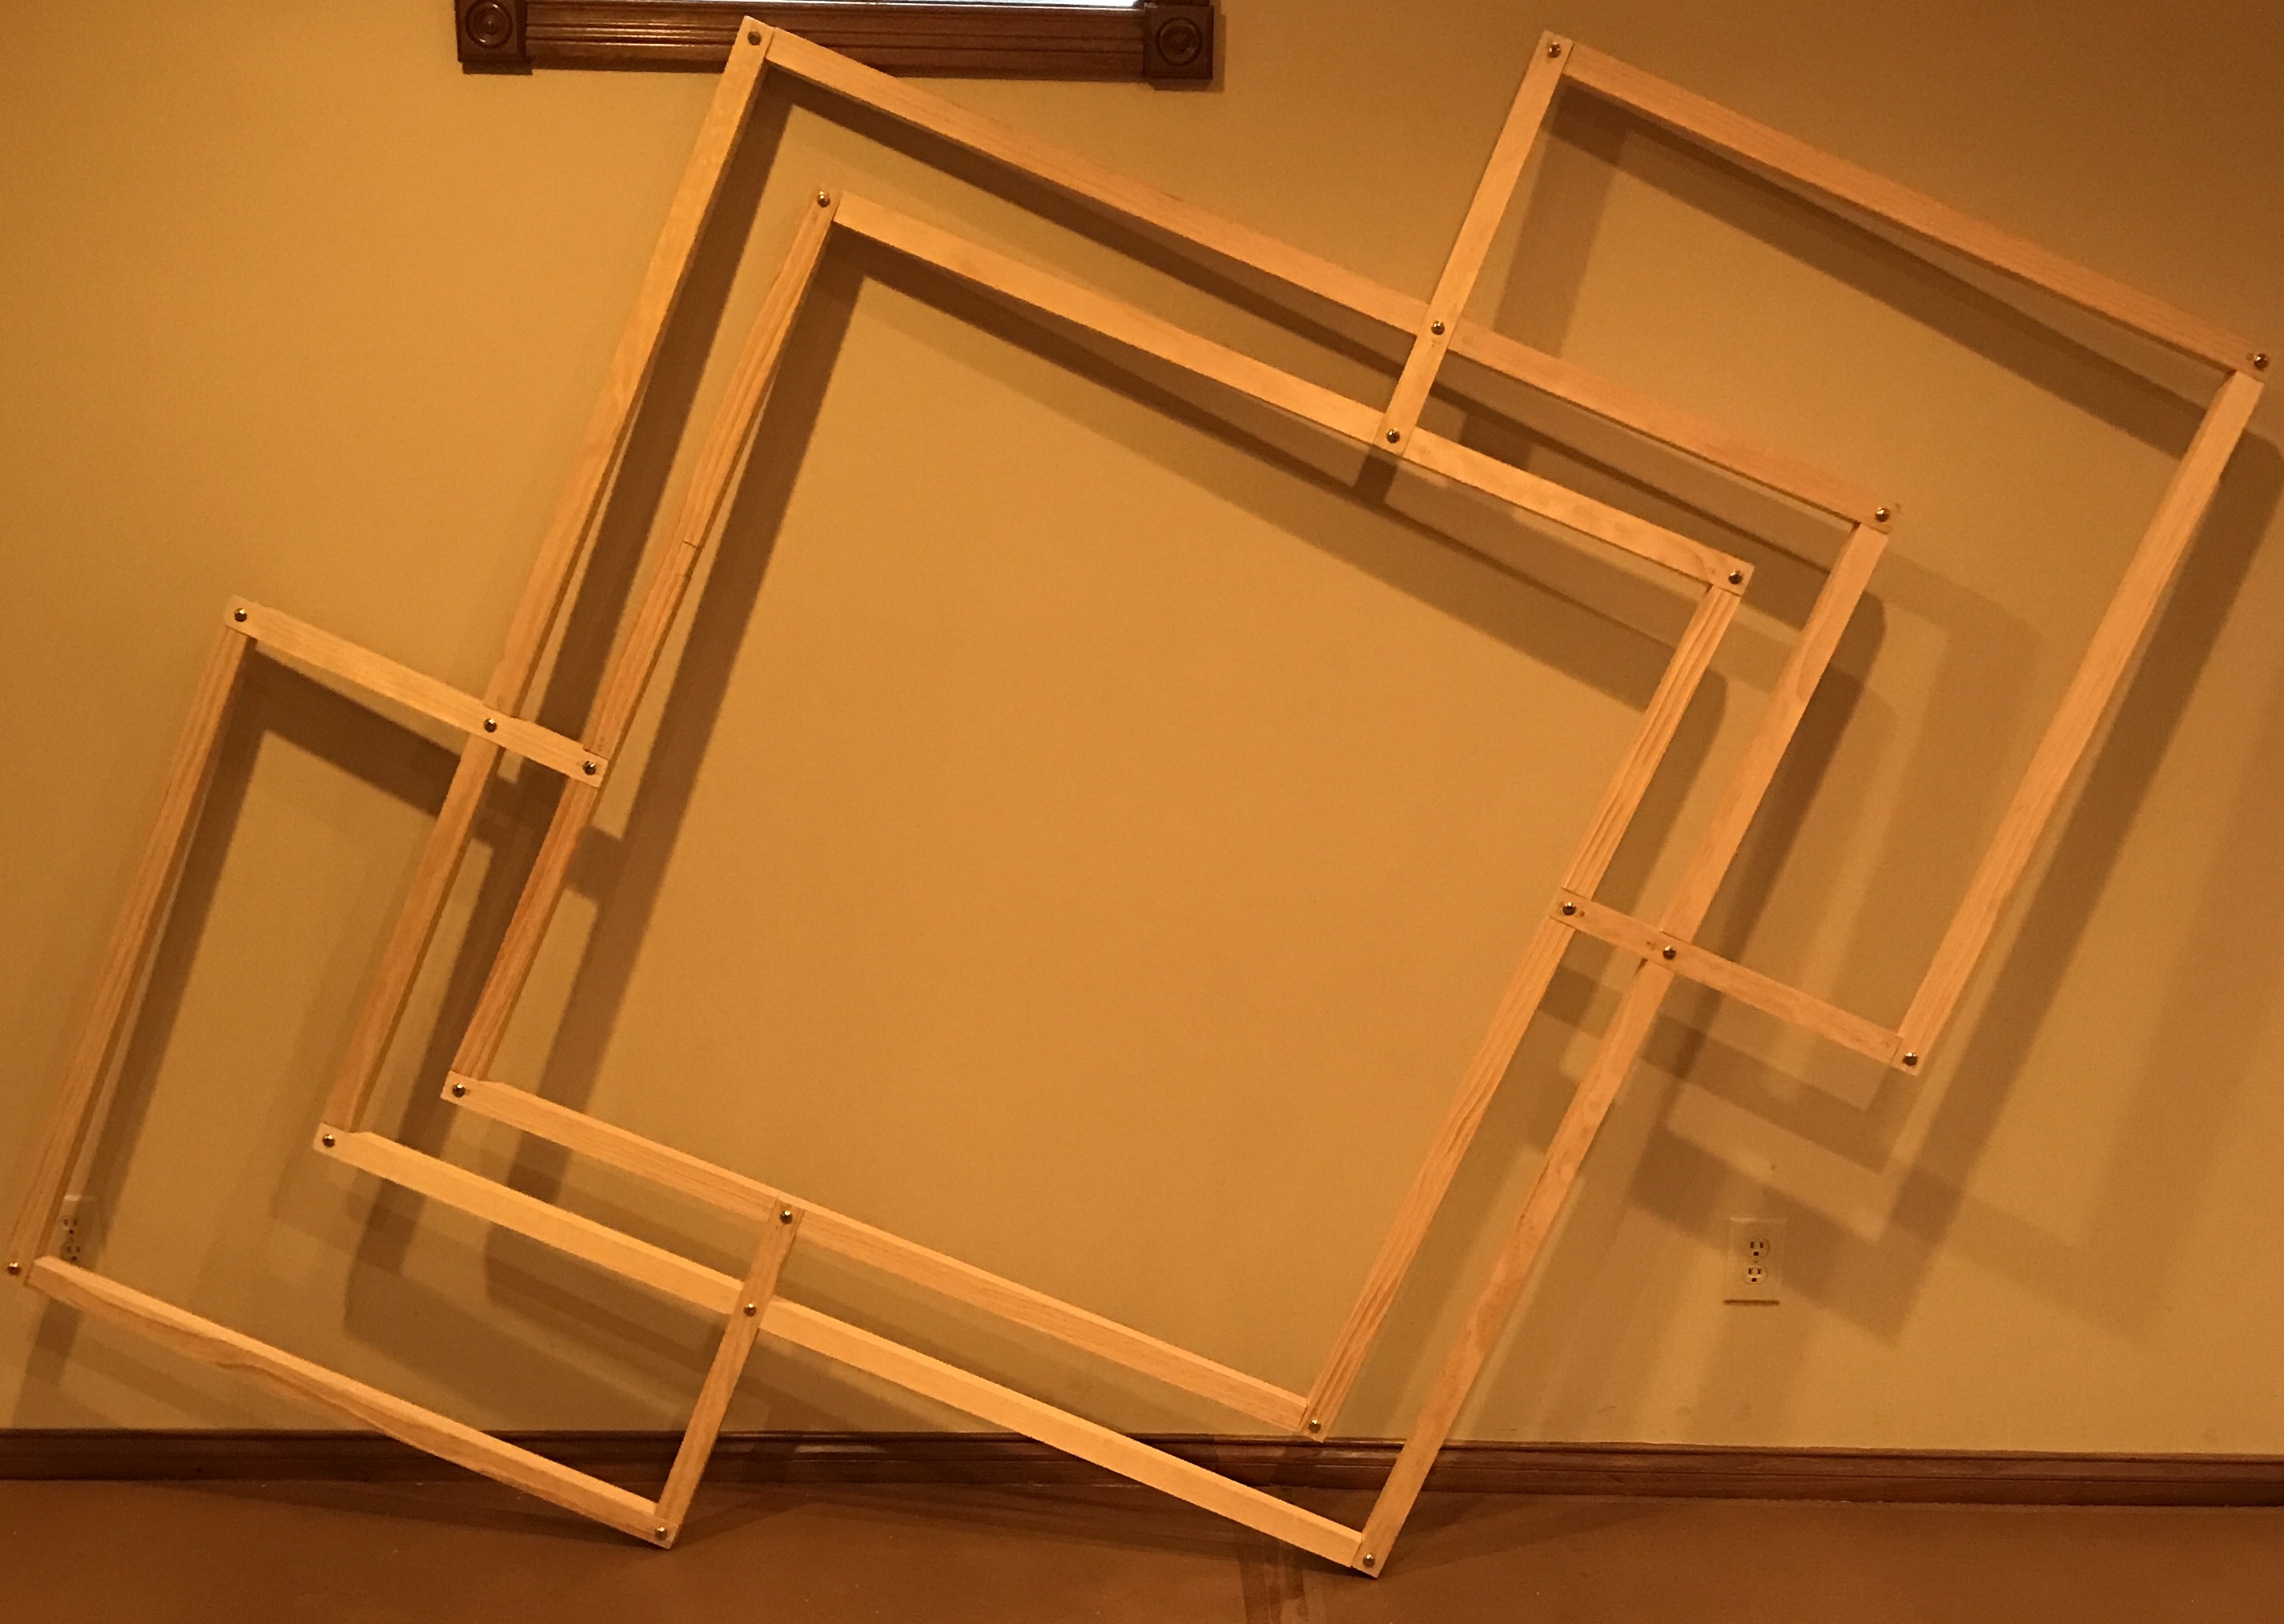
The next step was making the supports. An 8' length of 2 X 2 was cut in half to give two oversized legs. These were aligned relative to the backdrop with tape measure and square. The backdrop was then marked along the sides of the two legs to establish the areas to be removed for these six 45° lap joints. I think it will be more effective to cut these sides of the laps first followed by putting the leg in place and marking it for the other halves of the lap joints. The miter was set first to 45° for three lap joints and then to -45° for the other three lap joints on the backdrop. The legs were then set in these cut laps and marked for the mating laps, These were cut on the table saw and gave a pretty nice fit for the six joints. The tops of the legs were then cut at 45° to align with the inside of the medium square. The six joints were then drilled 1/4" and the entire assembly was screwed together. This is shown in the picture below.
The length of the legs will be adjusted when the feet are added. Currently, the lowest point of the large square is about 8" above the bottom of the legs. This should be closer to 4".
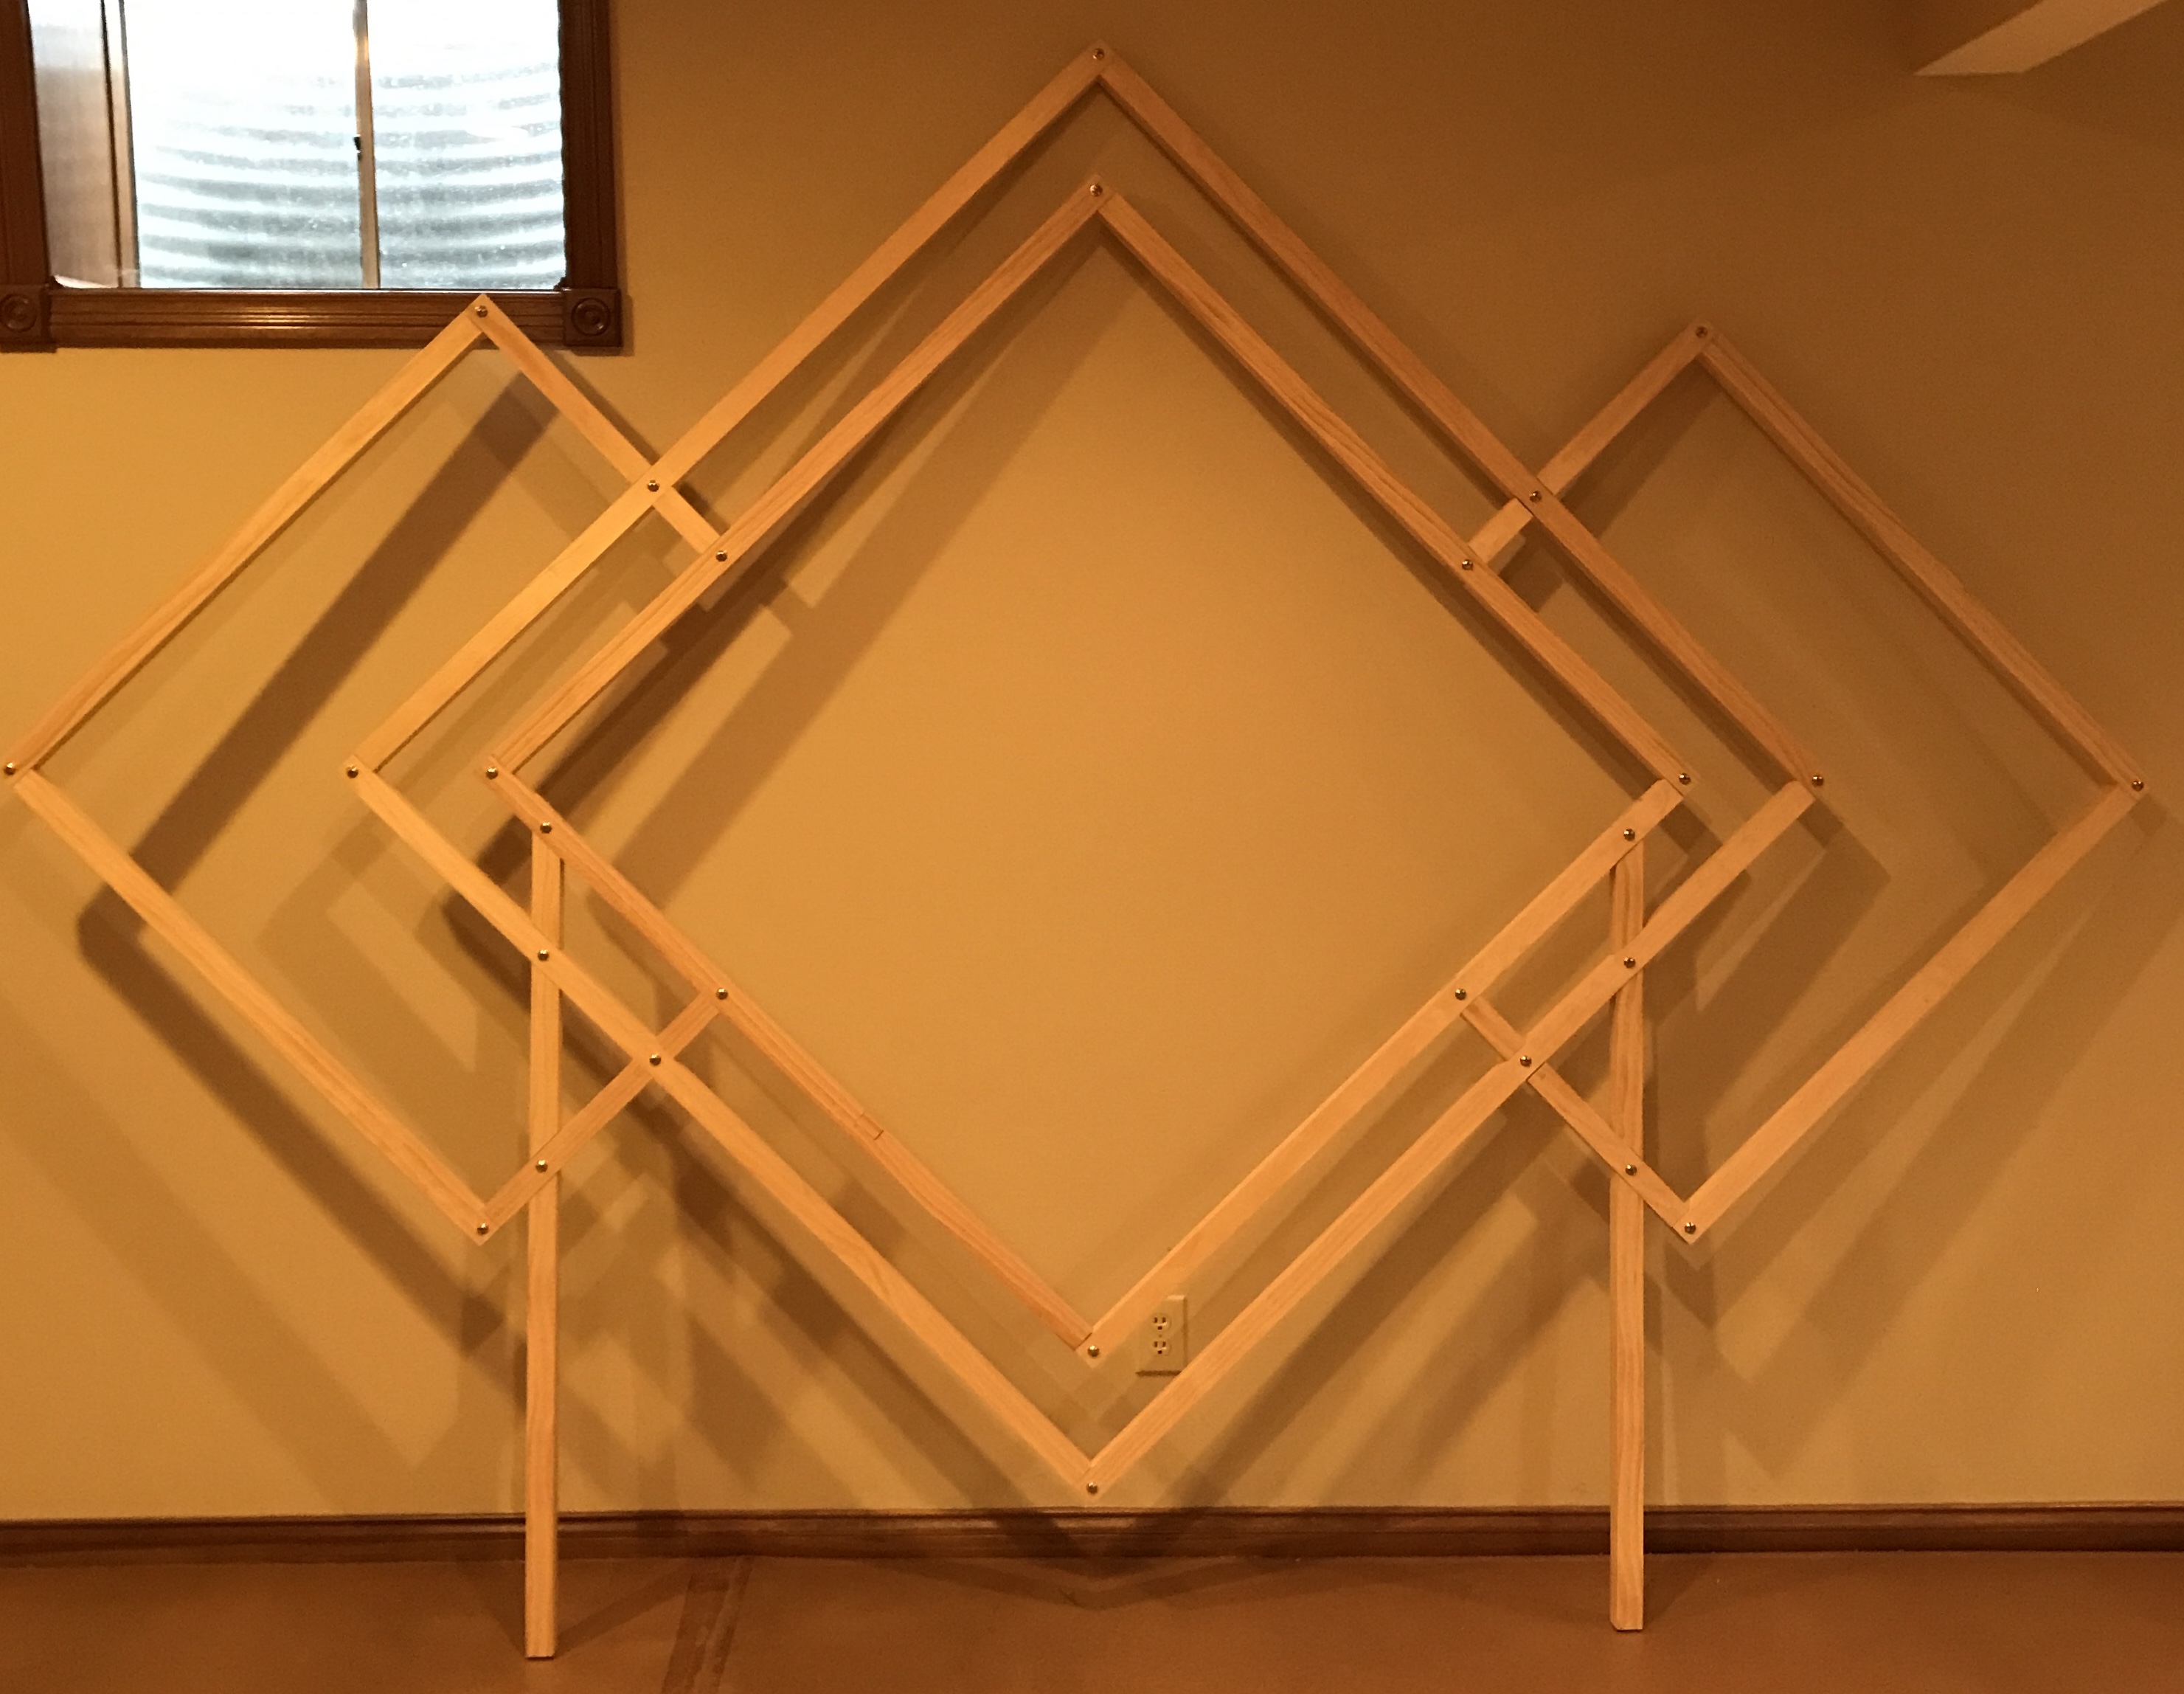
Two boards were cut in two to make four ~48" lengths of 2 X 2. The final board had two 3' lengths cut from it for the eventual angled supports. The four 4' lengths were paired up and the 1 1/2" X 3/4" lap joint was cut across each pair on center. After checking for fit the pairs were glued together and then screwed with 2 1/4" drywall screws. The glue squeeze out was cleaned up with a chisel and sandpaper. The legs were first cut to about 45" to give a 5" gap between the center point of the backdrop and the floor. The legs were then inserted into the lap joint, adjusted to 90°, and clamped. The supports were laid across the leg and base, set to 16" from joint to the inside corner where the support crossed the leg/base, and marked. The supports were cut with the pull saw at approximately 45° along the marks just made. Carpet tape was used to hold the supports in position so a 1/4" hole could be drilled through the support and into the leg and base. The 1/4" holes (not through) in the leg and base were opened to 3/8" and a threaded insert was screwed into place. The support was then held at a 45° angle in the drill press by rotating the table. After aligning the hole with a 1/4" drill in the spindle a 3/4" Forstner bit was used to create a deep countersink. The supports were then screwed to the leg/base assembly. The legs were finally attached to the backdrop as seen in the following picture.

Now, what color should it be? The legs should probably be a light or even off-white color, while the backdrop might be a dark shade of something. Lily and Kevin want natural wood. After many delays I finally found the stain I wanted, Minwax Sedona Red, at Menards. I plan to stain and varnish the wood in the garage. I will think through the process in some detail prior to proceeding. There are a lot of boards that need to be stained and varnished. They want to pick up the backdrop next weekend.
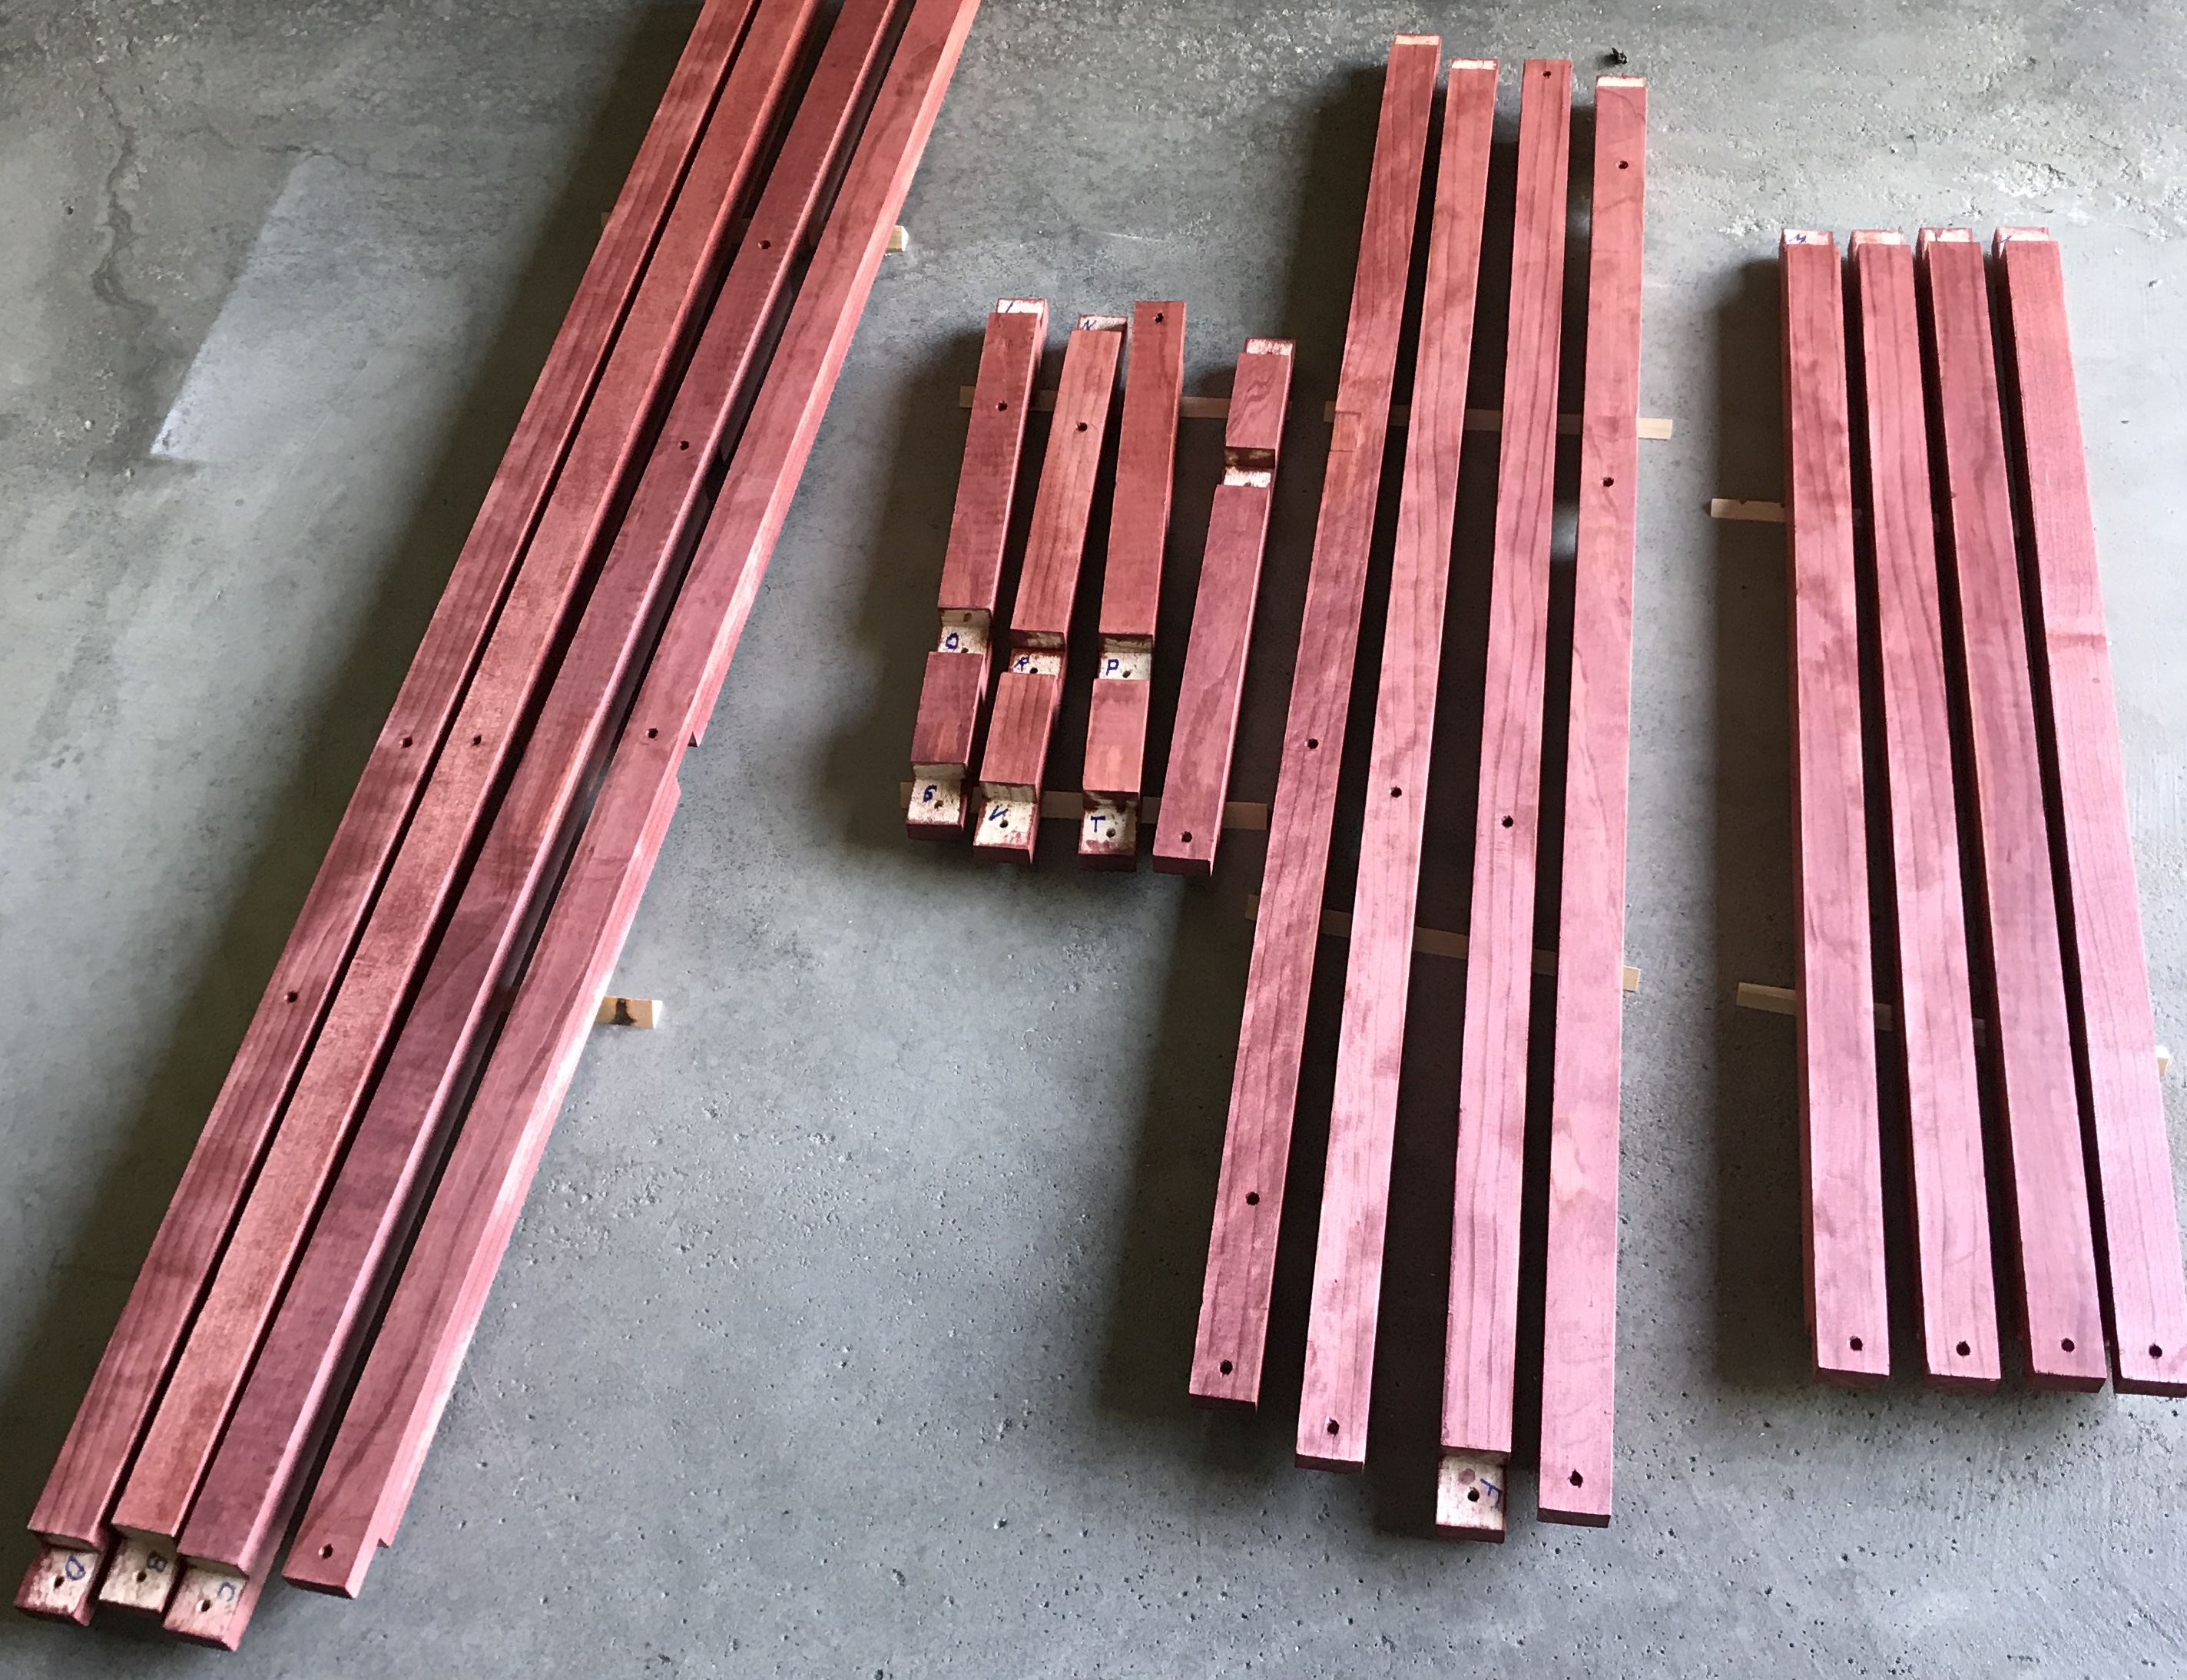
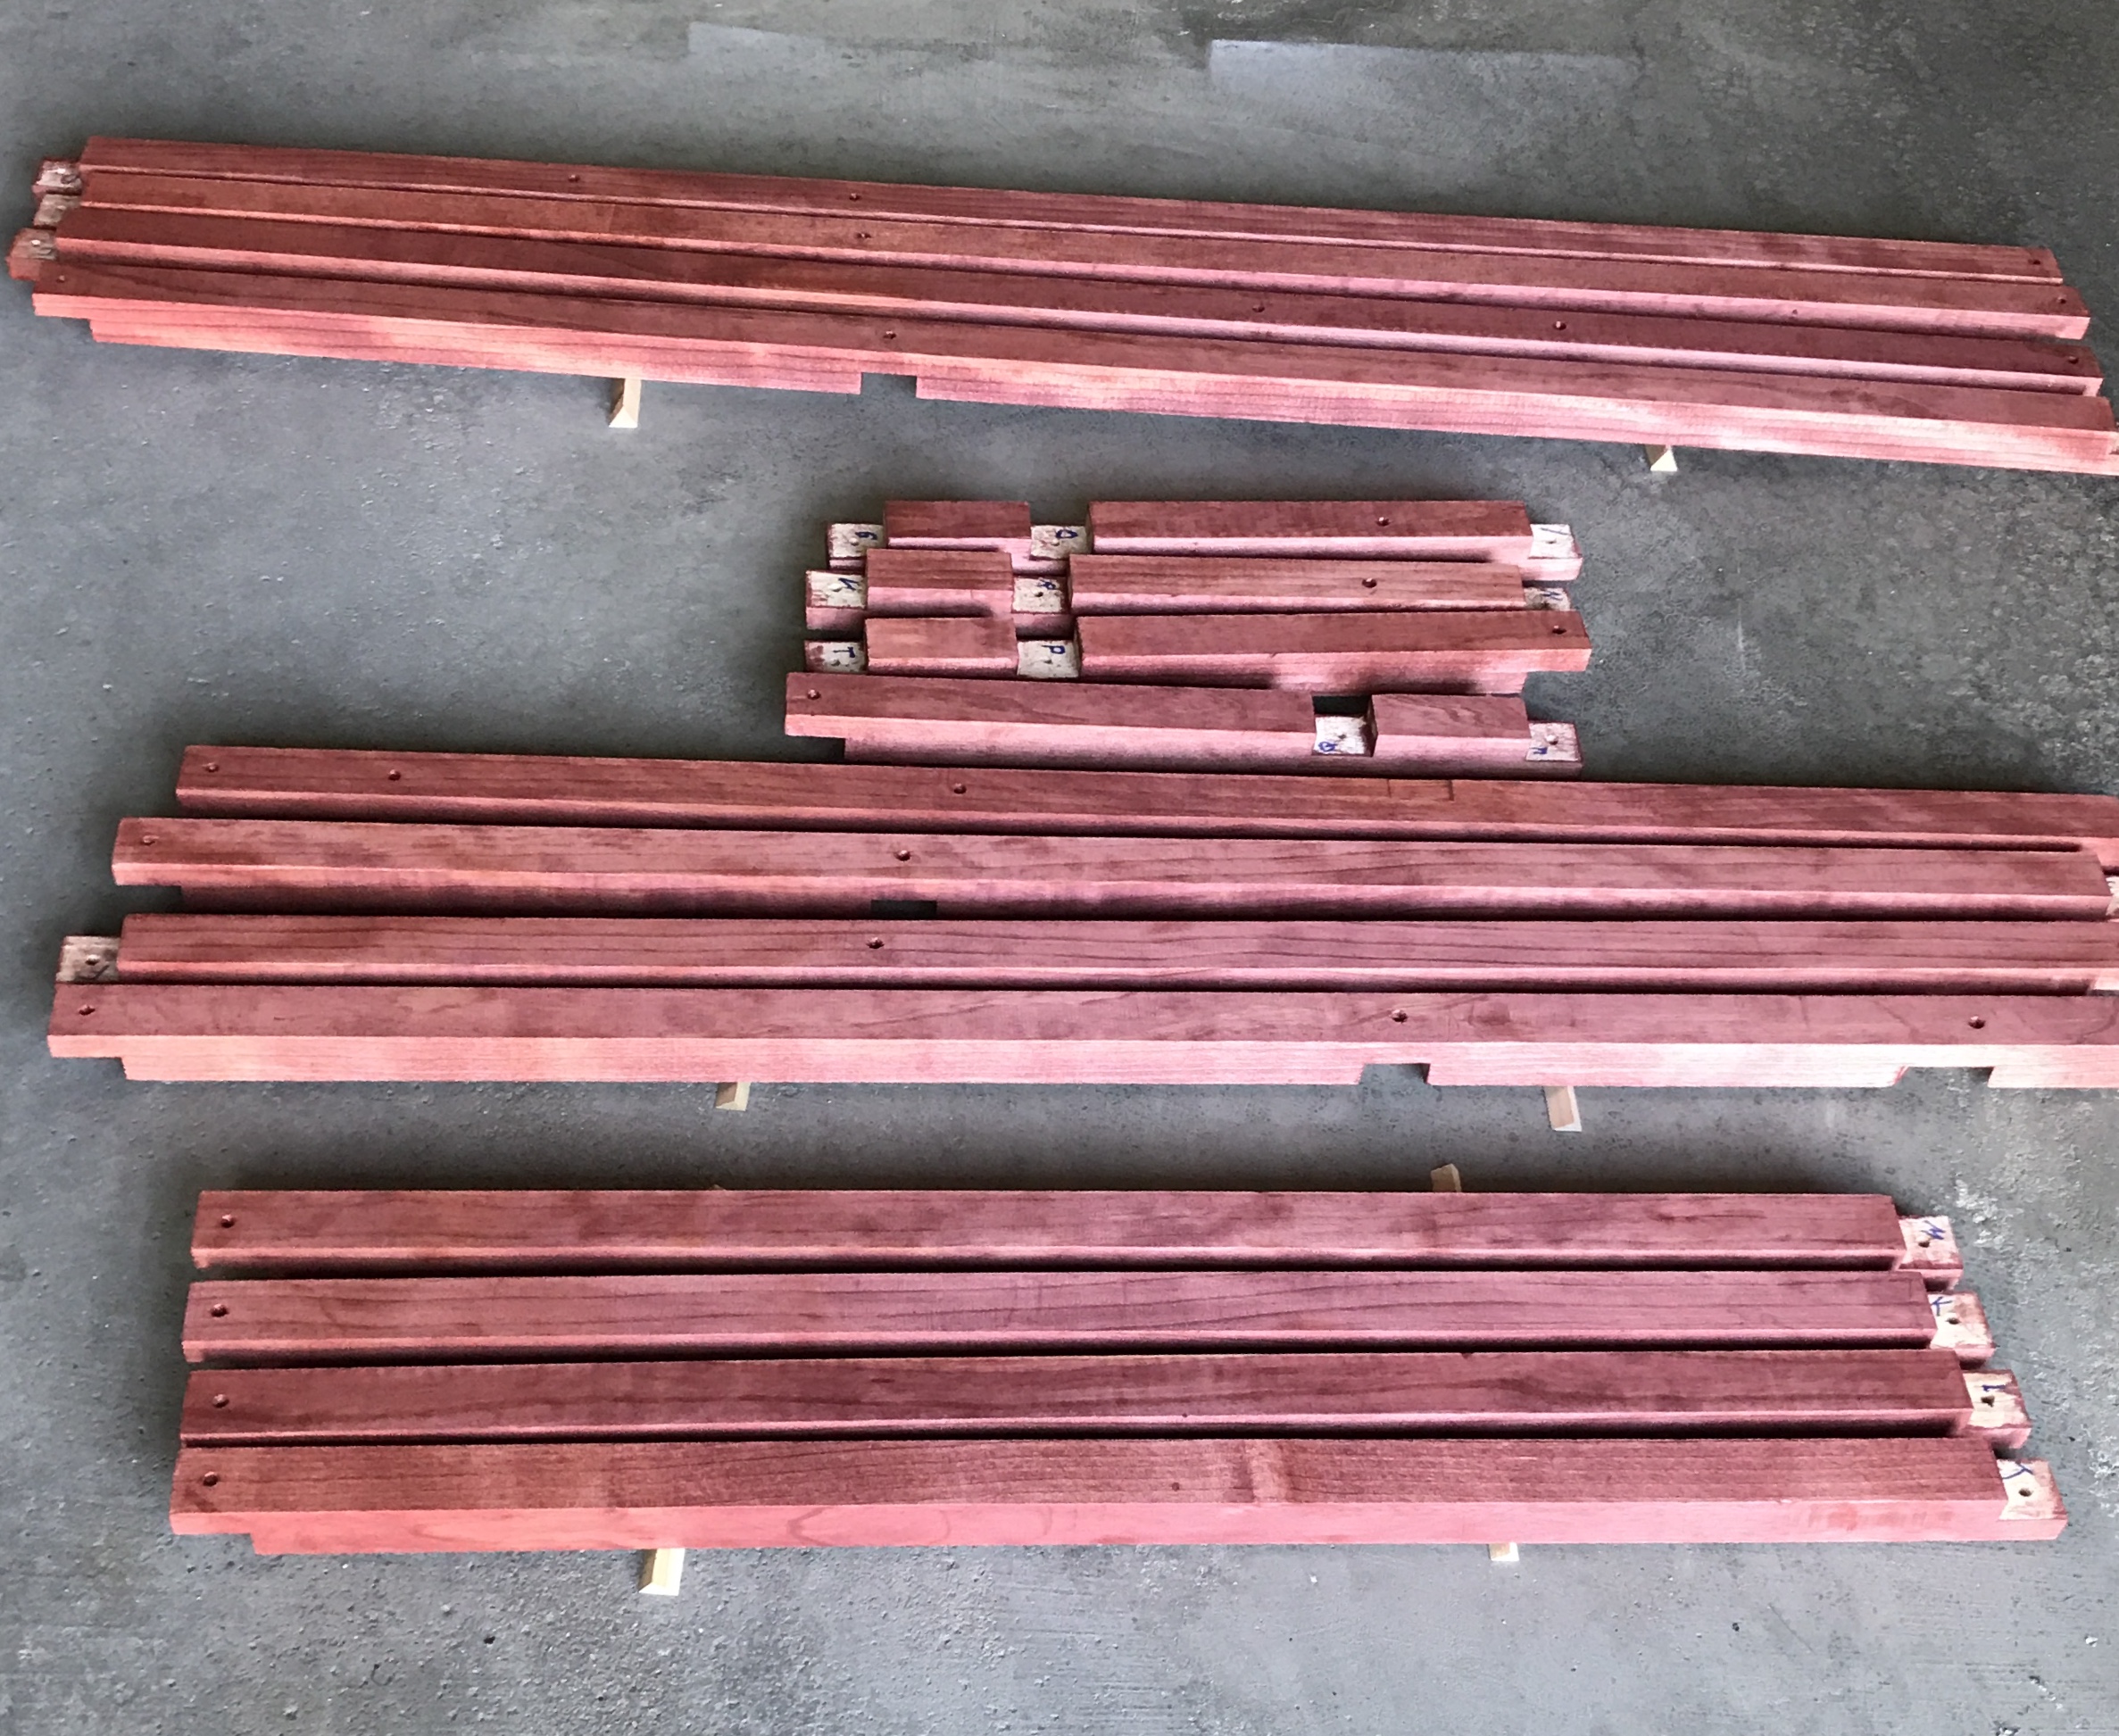
The boards were again labeled. This time a marker was used to label the inside of each of the joints. Both sides of the joint used the same letter and the side that goes in front was also labeled with an "F". The boards were sanded to get rid of pencil marks and a few rough ends were also sanded. The board with the repaired dado had wood putty added and it was then sanded. Each of the boards was painted with the Sedona Red stain. After 10-15 minutes any excess was wiped off with a towel. The stained boards do remind me of the red rocks of Sedona. The color is redder that shown on the various web sites. The two photos below show the shades of red as seen from different angles.
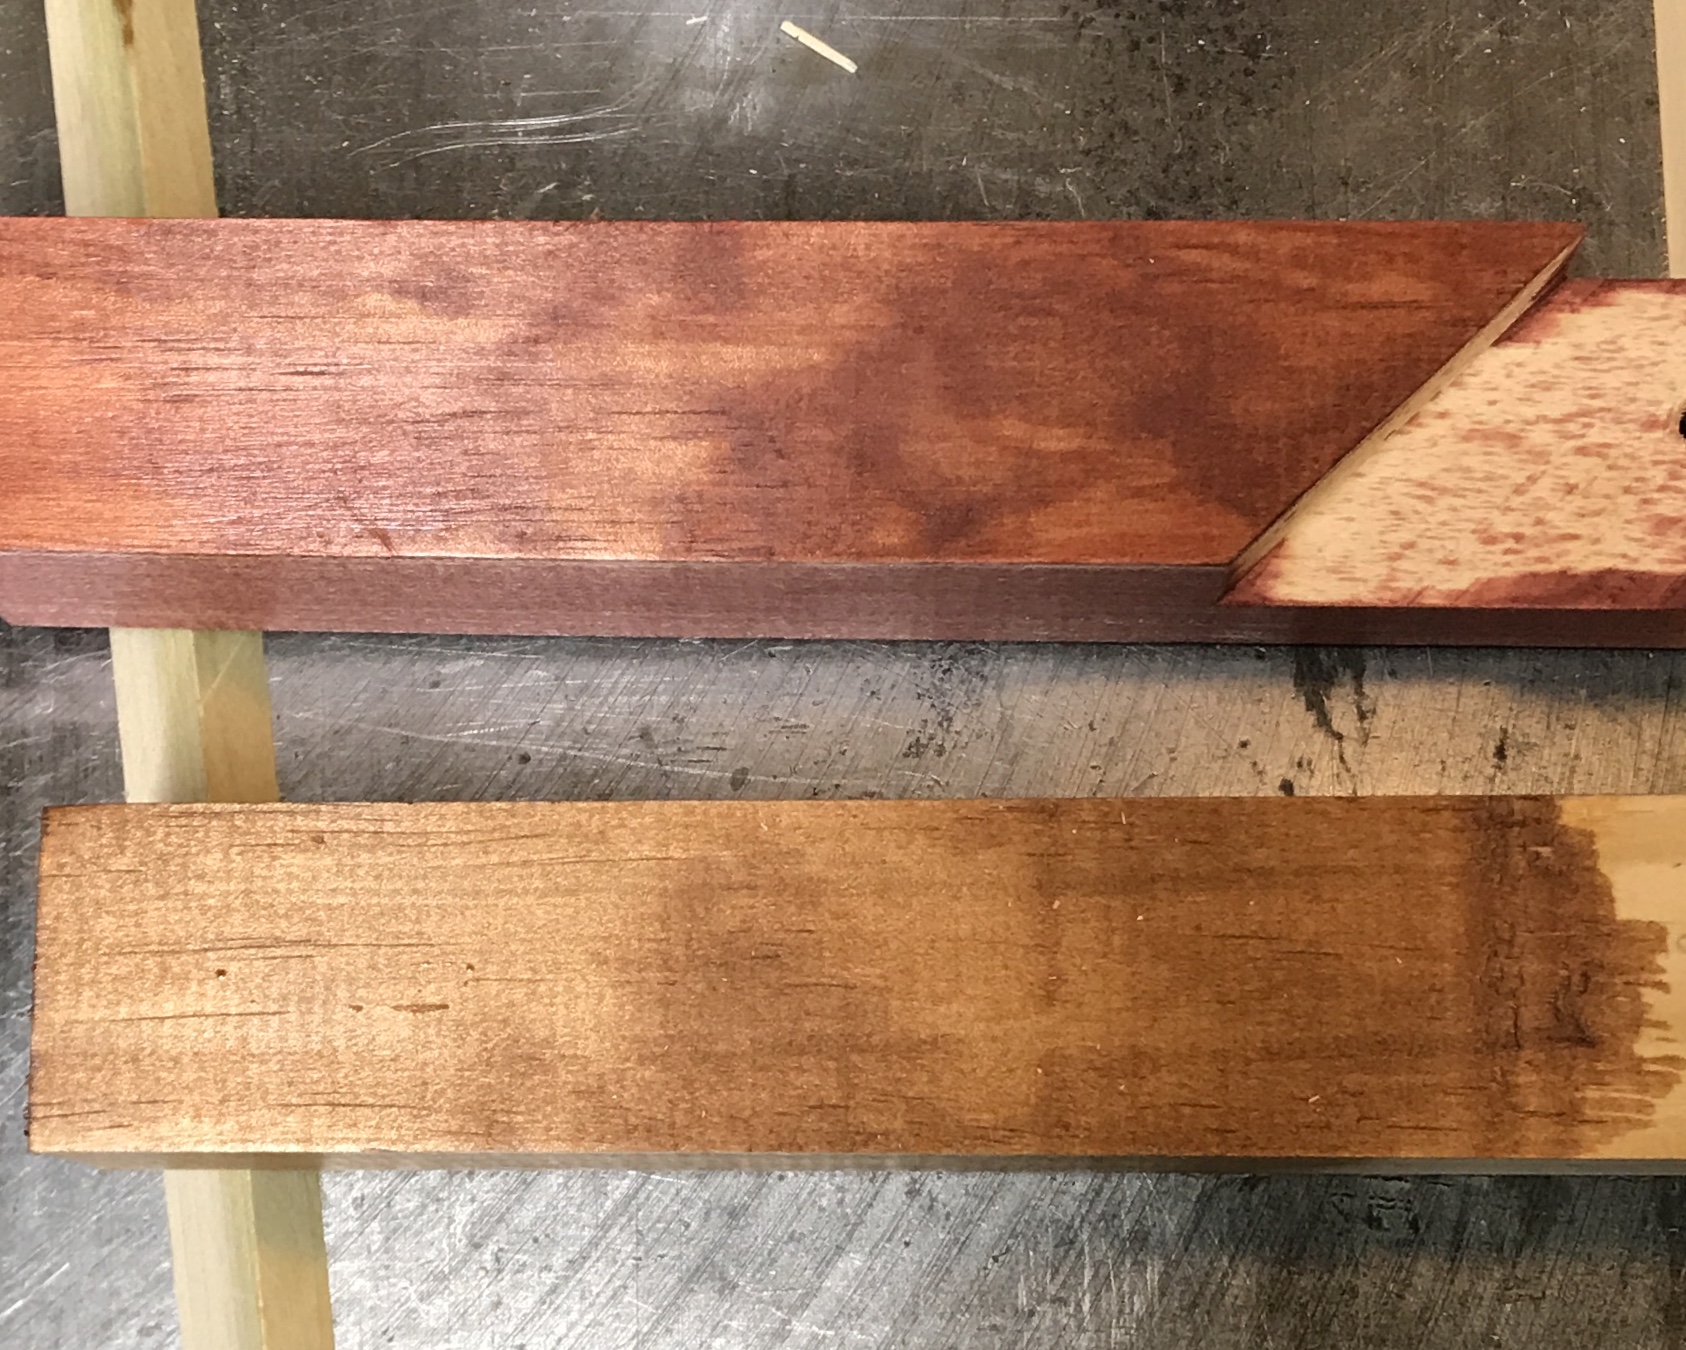
I am not sure if I like the red or if I should make it a little browner by a second coat of a different stain. Decided to test out potential second coats. I have three different stains. I had explored their use prior to purchasing the Sedona Red. They are all different shades of brown. I took one of the smallest cross pieces and tried each of the three stains on a third of the back side. After 10-15 minutes the excess stain was wiped off. The picture below compares the brown stain on the wood and the brown stain over the red. I liked the color on the right and proceeded to put a second coat of the brown Varathane stain on the stained parts followed by wiping it off as before.
The legs were the last thing to stain. Only a small amount of the brown stain was left. I mixed an equal volume of the Sedona Red into the can of brown. This was painted onto the legs and then wiped off after 5 minutes. After three days the first coat of polyurethane was applied with a brush to all parts. The temperature was just warm enough. After about 4 hours a second coat was painted on as well. The backdrop is now complete. Kevin and Lily are coming Saturday to pick it up. We will assemble it while they are here so they have some practice.
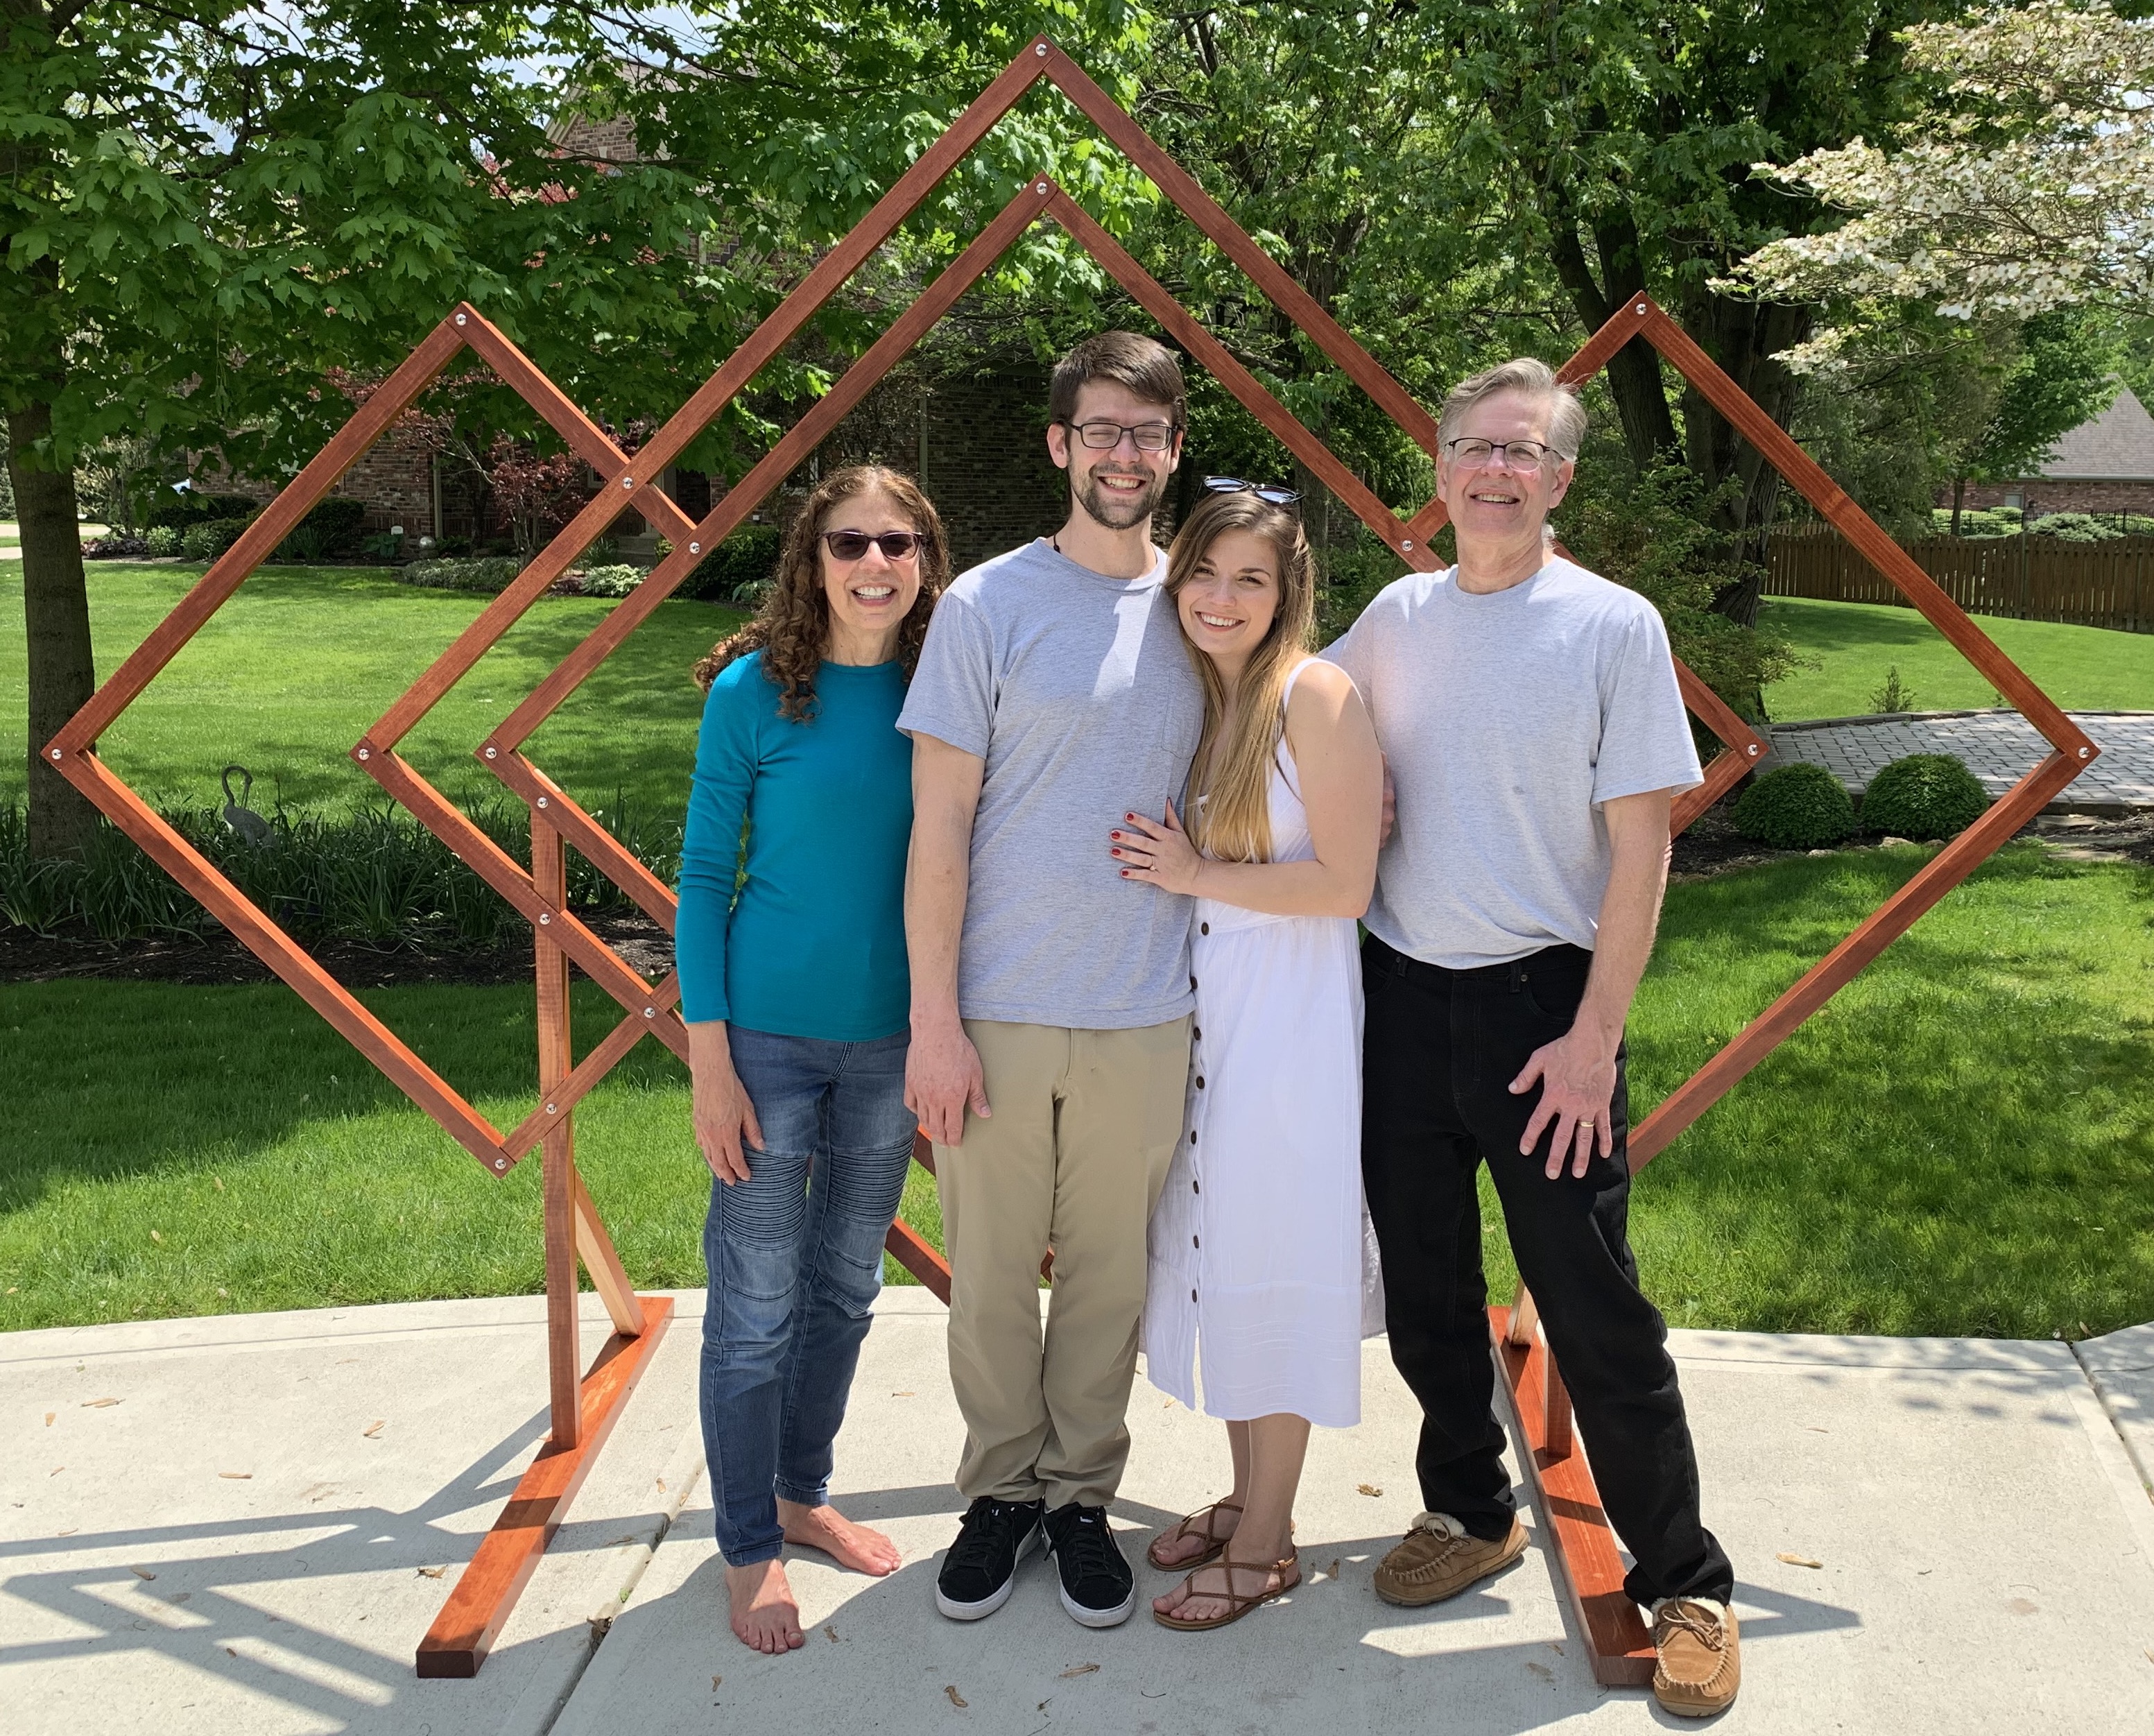
Kevin and Lily visited this weekend. We assembled the backdrop for practice. After carrying it outside a neighbor took a picture of the completed and assembled backdrop with the soon to be wed and the wed long ago included.